Sponge Painting Techniques
for Stunning
Decorative Art
Backgrounds
Whether you’re restoring a vintage tin tray with traditional tole painting motifs or preparing a wooden plaque for a modern art project, sponge painting techniques can set the background stage for your entire design.
A flat, solid color can sometimes make your beautiful artwork look stark, which is why mastering sponging techniques on a background is a game-changer.
Sponge painting adds instant depth, warmth, and an organic texture that can mimic aged plaster, parchment, or faux marble. This page is for you to use as a comprehensive guide.
I’m breaking down how to paint a sponged background for crafts, compare the best sponges to use, and explore both positive and negative sponging methods to elevate your next project. AND how to easily fix mistakes.

What Is Sponge Painting?
Sponge painting is one of those wonderfully simple painting techniques that can completely change the look of a project.
Instead of applying paint with a brush in smooth, even strokes, you use a sponge to apply or remove paint from the surface. The sponge leaves behind an irregular pattern of color and texture.
And that’s exactly what makes it so useful for decorative painting.
A sponged background gives your surface some variation. It can look aged, softly mottled, weathered, or even a little like stone or marble. Once you start playing with different colors and sponge techniques, you’ll see just how many possibilities there are.
Plus, the sponge leaves a slight texture on the background which is wonderful for dry-brushing highlight layers.
The best part? You don't have to make every little mark perfect.
In fact, please don't! The irregularity and randomness of these sponge painting techniques are part of the charm.
Choosing the Best Sponge for Painting
The sponge you choose has a big effect on the finished background.
There are 3 basic types I use for decorative painting:
- natural sea sponges,
- synthetic craft or household sponges or
- cosmetic sponge wedges
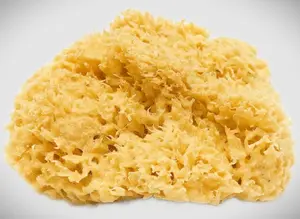
Natural Sea Sponges
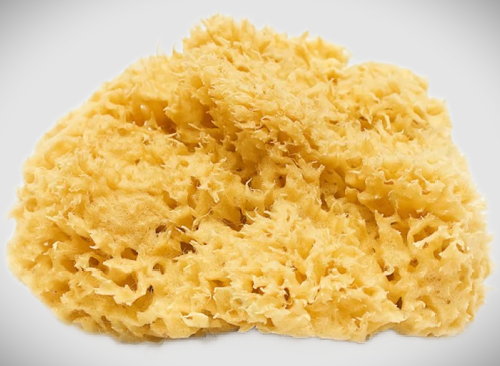
Natural sea sponges have an irregular, organic texture. No two sponges are exactly alike. How wonderful is that!
Their open, uneven texture creates soft, random patterns that are perfect when you want a natural-looking background.
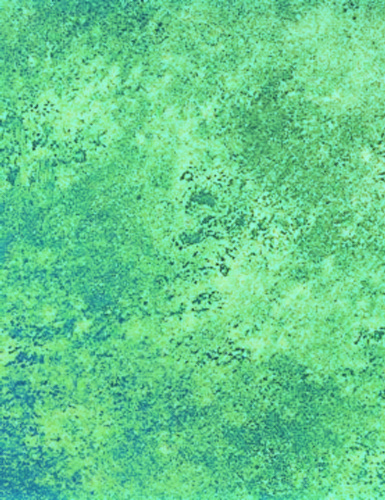
Use a natural sea sponge when you want:
- A soft, organic texture
- Irregular color variation
- A mottled or aged appearance
- A faux marble or stone effect
- A traditional folk-art background
Natural sponges are especially useful when you don't want your background to look obviously "sponged."
That's the secret. You want the texture to support your painting, not announce, "Hey! Look at me. I got sponged!"
Synthetic House or Craft Sponges
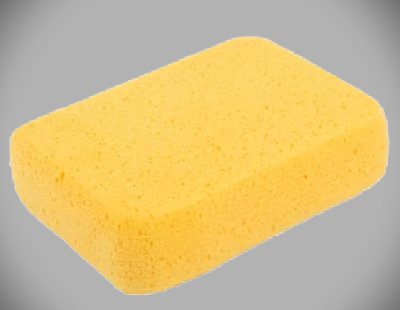
Synthetic sponges have a denser and more predictable texture. They’re available in different shapes and textures, which makes them handy when you want more control over the finished effect.
The results of different sponge painting techniques depend on the density of the sponge you choose. Experiment!

They work well for:
- Crafts and home décor
- More uniform backgrounds
- Larger surfaces
- Simple color blending
- Projects where you want a repeatable texture
A synthetic sponge is also a perfectly good place to start if you're new to sponge painting. You don't need a drawer full of specialty painting supplies.
Sometimes the sponge sitting under your kitchen sink is ready for its big artistic debut! Just make sure it's clean and free of household cleaners.
Cosmetic Sponge Wedges
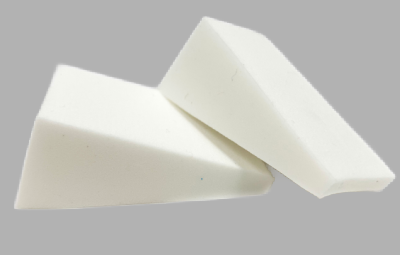
I've also had success using latex-free cosmetic sponge wedges. They're a perfect size for small projects.
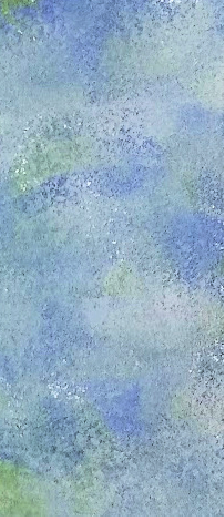
The sponge is very dense and bouncy and leaves a soft pebbly texture, like an eggshell finish.
And the tapered end, acts like a little built-in handle.
I use these cosmetic sponges in my art journals frequently and I love them. They're inexpensive and can be washed and re-used many times.
How To Prepare Your Surface
for Sponge Painting Techniques
Before you start sponging, prepare your surface just as you would for any decorative painting project.
Your surface should be clean, smooth, and properly sealed and basecoated for the project you're painting.
Start with a solid base coat and let it dry completely. That base coat is more important than it might seem. You'll see why in a second.
When you're working with multiple colors, decide which color you want to see underneath the sponged layers. This becomes your foundation color.
For example, you might use a warm cream as your base coat and then add tan, golden brown, and a touch of a deeper brown for an aged parchment effect.
Now you're ready to sponge!
Positive Sponging: Add the Paint
Positive sponging is likely the first method that comes to mind when people imagine different sponge painting techniques.
You're adding paint to the surface.
Start with your dry basecoat. Load your sponge with a small amount of paint, then gently dab the sponge onto a wax palette to remove excess paint.
This step matters. Too much paint on your sponge gives you blobs. We're after texture, not blobs.
Press or dab the sponge onto the surface, varying the pressure and direction as you work.
Don't drag the sponge. Don't twist it on the surface.
Dab, lift, move over, and dab again.
Rotate the sponge as you work so you don't create a repeating pattern. Keep checking your background from a little distance, too. It's surprisingly easy to get so focused on one little area that you lose sight of the overall effect. You'll get the hang of it!
Let's try it!
For a simple decorative painting background, try this:
- Basecoat the surface with your chosen color.
- Let the base coat dry completely.
- Load any of the suggested sponges with your second color.
- Dab excess paint onto a wax palette.
- Lightly dab the sponge over the surface.
- Rotate the sponge as you work.
- Soften any areas that look too heavy.
- Allow the layer to dry before adding another color.
You don't need to cover every bit of the base coat. Leaving some of that first color showing through is what creates the depth.
Negative Sponging: Subtract the Paint

Negative sponging works in the opposite way.
Instead of using a sponge to add paint, you use a clean sponge to remove wet paint. This is one of my favorite ways to create a soft, aged background.
Start with your dry base coat. Apply a thin layer of your second color, often mixed with a glaze if you need more working time.
While that layer is still wet, use a clean, slightly damp sponge to dab some of the wet paint away.
As you remove the top layer, the base coat underneath begins to show through. And there you have it. Instant variation!
Let's try this sponge painting technique.
I'll hold your hand!
- Apply and dry your base coat.
- Apply a thin coat of your second color or glaze mixture if you need more "open" time.
- While the paint is still wet, gently dab with a clean sponge.
- Lift the sponge straight up rather than dragging it.
- Rotate the sponge as you work.
- Clean or rinse the sponge when it becomes loaded with paint.
- Continue until you have the amount of variation you want.
- Let the surface dry completely.
The trick with negative sponging is to work while the top coat is wet.
Once it dries, the party is over. So have your sponge ready before you apply the wet layer.
If you're covering a large area, have 2 or 3 damp sponges ready to go.
How To Create
a Mottled Sponge Painted Background
Mottling is the soft variation you get when two or three colors are blended together without creating obvious spots or patches.
This technique is especially useful for traditional decorative painting and folk art.
Start with your base coat. Then choose two or three colors that work well together.
You don't need three completely different colors. Often, the nicest results come from colors that are close in value.
For example:
- Warm cream
- Tan
- A soft golden brown
Or:
- Pale blue
- Medium blue
- A touch of blue-gray
Load a small amount of the first color onto your sponge and dab it over the surface.
Then introduce the second color while some of the first color is still wet. Don't try to blend everything into one uniform color. You're creating variation.
While still wet, add your third color sparingly. A little often goes a long way.
The Secret to Seamless Mottling
The biggest mistake with mottling is using too much paint.
If you see obvious circles or heavy patches, your sponge is carrying too much paint.
Dab some of it off onto a wax palette and try again.
Also, keep changing the part of the sponge that touches the surface. Rotate it. Turn it. Change your pressure. Your goal is to avoid a repeating pattern.
A good mottled background should make the viewer wonder how you created all that lovely variation. That's when you know you've got it!
Creating a Faux Marble Effect With a Sponge
You can use sponge painting to create a soft faux-marble effect without making the background complicated.
Begin with a light base color. Then sponge two or three related colors over the surface, allowing each color to peek through the others.
Keep the colors soft and irregular. Don't create obvious dots.
Once the mottled background is dry, you can add fine veins with a liner brush if your design calls for them.
This works beautifully for decorative painting projects where you want the appearance of aged stone, marble, or an old painted surface.
And remember, faux marble doesn't have to look like a photograph of marble. You're creating an impression of the material. That's enough.
How To Fix a Sponge Painted Background
Here's one of the best sponge painting tricks I can give you.
Use your base coat color to sponge back over the problem area.
Let's say you've finished your background and suddenly notice one big dark blob staring back at you.
Don't panic.
You don't have to strip the whole thing and start over.
Load your sponge lightly with the original base coat color. Dab most of the paint off onto a paper towel, then gently sponge over the heavy area.
Soften it.
Then blend a little of the surrounding colors back into the area if needed.
This is called sponging back, and it gives you a tremendous amount of control.
You can use it to:
- Soften a dark area
- Break up a heavy patch
- Reduce contrast
- Cover an accidental mark
- Balance the overall background
- Blend an area that simply doesn't look right
I use this trick all the time.
And here's something worth remembering when you're painting.
You don't have to get it right the first time.
Paint is wonderfully forgiving.
If your background gets too dark, sponge some of the lighter base color back into it. If an area becomes too light, add another thin layer of color. You can adjust it.
That's a much better mindset than standing there staring at one ugly spot and deciding you've ruined the entire project. Ask me how I know!
What Paint Is Best for Sponge Painting?
Acrylic paint works beautifully for decorative sponge painting techniques. It's easy to thin, easy to layer, and dries relatively quickly.
Your paint consistency depends on the technique you're using.
For positive sponging, you generally want enough paint on the sponge to leave color behind without creating heavy spots.
For negative sponging, a thinner wet layer gives you more time to remove paint and create variation. If you're using a glaze, you'll have even more working time. That's especially useful on larger surfaces.
Always test your colors and technique on a scrap piece of the same or similar material before working on your finished project. It takes a few minutes. But, it will save you a lot of grumbling later.
Let's go back to the HOME page.

Cheryl Poulin, CPC, has been helping decorative painters of all levels grow their acrylic painting skills since 1993. She has taught thousands of students, published 50+ instructional packets and videos, and helped revive interest in the decorative art form with a beginner painting program using her step-by-step Earmark Studio Method.
Cheryl’s work has appeared in publications such as: The Decorative Painter, PaintWorks, and Tole World. Cheryl provides your-decorative-painting-resource.com as a free resource. She’s happiest when she sees her students succeed. Cheryl relaxes with a brush in hand, painting, doodling, and creating.
Grow Your Painting Skills With Me
You Can Paint These Trees and More

Get Your Video Course Now
Introductory Price
Save 30% plus
a Money Back Guarantee


You Can Paint These Trees and More
Get Your Video Course Now
Introductory Price
Save 30% plus
a Money Back Guarantee
Recent Articles


-
CBP0048 - The Promise of Autumn Pattern Packet
Sep 28, 26 04:04 PM
 Enjoy this quick and fun project featuring background creation with alcohol
-
How to Paint Galvanized Metal with Acrylics: Complete Prep Guide
Sep 28, 26 01:25 PM
 Stop acrylic paint peeling off galvanized steel! 5-step prep routine decorative painters use to make art stick and how to paint galvanized metal with acrylics.
-
Learn sponge painting techniques to create textured backgrounds.s.
Sep 07, 26 03:21 PM
 Discover positive and negative sponge painting techniques. Use different kinds of sponges for mottling, marbling, and learn easy fixes when you make a mistake.
-
CBP0047 - Sunflower Folly Pattern Packet
Aug 30, 26 02:02 PM
 Increase your painting skills. Enjoy learning the wet dry brush technique in my CBP0047 - Sunflower Folly pattern packet.
-
A decorative painting pattern guide helps you choose what to buy.
Aug 30, 26 09:13 AM
 Use Cheryl Poulin’s ultimate decorative painting pattern guide to discover how pattern packets work for beginners vs. advanced painters! Choose wisely.
-
Learn how to use a liner brush for swirls and smooth curlicues.
Aug 22, 26 02:52 PM
 Ever painted a curlicue that suddenly turned into a skinny worm with a kinked body? I'll show you how to use a liner brush for swirls you'll be proud of.
-
Ugly stage of a painting, it happens. Don't shelve your project yet.
Jul 19, 26 08:10 AM
It's a frustrating thing but it's to be expected. The ugly stage of a painting simply means you're about halfway through your project. Take heart and keep going!



Site Search
| site search by freefind | advanced |


You Can Paint These Trees and More
Get Your Video Course Now
Introductory Price
Save 30% plus
a Money Back Guarantee