- Home
- ALTERED BOOKS
How to Make Altered Books
Step by Step
I got to thinking that it would be fun to show you how to make altered books using some of my step-by-step demonstrations.
I think visual guides are very important when it comes to explaining techniques.
Follow along over the next while as I make art from an old worn out book destined for the landfill site. Artists are the ultimate recyclers, don't ya know!
A lot of people have never made an altered book and for them I have all the help they'll need! For those of you who have made altered books in the past, let this serve as inspiration to go make more art!
Introducing... Earmark Creative Studio

Heck!! What are Altered Books, Anyway?!
You're going to love this... Altered Books are books that have been given a new life in the form of art. Be they old, dilapidated books or new ones, their covers and pages can be altered in many ways.
You can paint them, cut, fold, burn, sew, collage, tear, drill, glue or adorn them in any way your imagination sees fit. I've been told I have a vivid imagination, so anything goes!!
How to make altered books will be explained thoroughly. Over time, I'll show you all sorts of techniques... most of these you could use in other art projects too!
As an avid altered art and mixed media artist, I'm always looking for new ideas. For ever it seems I'm on the look out to break through a creative block. And of course, like you, I'm perpetually looking for new materials and techniques.
What Kind of Books Do I Need
to Learn How to Make Altered Books?
This old book came from a thrift shop and cost 25 cents.
The cover is stained and frayed.
To me, that's a perfect candidate: cheap and worn out.
I also like the fact that the book is not 3 inches thick! The fewer pages there are, the quicker the book will be finished. In this case there are only 185 pages.
If you're feeling adventurous, by all means feel free to alter a set of old encyclopedias!!! :o)
Here are important tips for how to make altered books:
 Sewn signatures
I personally insist that the book I'm going to alter have its pages sewn rather than glued.
The book is far stronger and will put up with a lot more handling.
The finished book will be handled a lot and you don't want pages coming unglued and falling out of the binding.
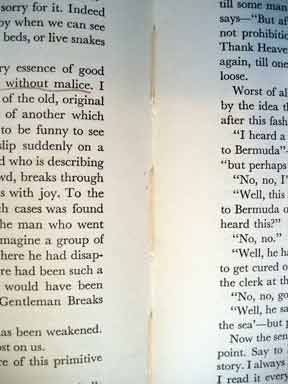
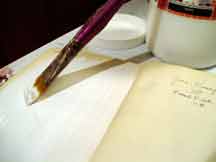
Here's what you look for... each signature in the book is sewn to the binding. This is the mark of a well constructed book. You can see the signatures in the photo below.
I think this is one of the most important tips for how to make altered books.
 Signatures
So before you run out and buy tons of old books, look for the sewn signatures.
If you open the signatures in the middle, you'll see the stitches, as shown in the image above.
OK, now it's time to look at the book and decide what I want to do.
I'm going to spend a bit of time looking for content in the pages that may offer up some inspiration. I like to create stories or poetry by using some of the words on the pages before I art them up.
Here's an example of a couple of pages from one of my books. It's altered and I've used some of the words from the book to create a HUMUMENT.
There's a lot that goes on when you're learning how to make altered books!
A Theme
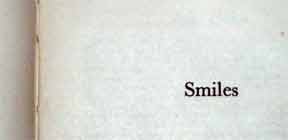
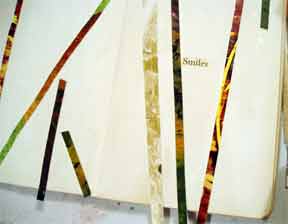
Lucky me! While flipping through the first few pages of the book I found this lone page. What a sunny little word!
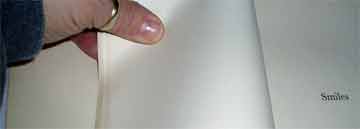
My theme is SMILES. It's perfect and it offers up a totally blank page on the left hand side.
So while I ponder how I will decorate these pages, I have some preparations to do. And of course, I'm smiling.
Some people like to prepare a whole book at once, but I don't. I can't think that far ahead. How to make altered books can be done in many ways to suit any personality.
I've decided to glue the first 6 pages together.
The book is old and the paper is whisper thin.
This step will add strength to the finished artwork. By doing this, I have made one page out of six.
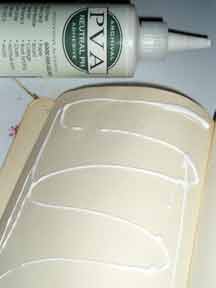
I proceed to glue one page at a time. I like to use PVA glue or Gel Medium as my adhesives of choice.
If you use a glue stick, your pages will come apart in time. I do not recommend it. You may very well regret it.
Apply the adhesive to one page and lay the opposite page down. Use the palm of your hand to smooth the paper down.
You may feel little bumps and ridges, but don't sweat it. By the time you're done with the decorating, it won't matter.
When you have your selected pages glued together, let the glue dry. Make a cup of tea and think a bit more about your theme.
I've decided to prepare some pages with Gesso. Since I'll be painting and gluing things down, the pages need to accept moisture without buckling or weakening.
Gesso is one of the products I like to use for that purpose. There are others, so keep reading.
Start by dampening a 1" flat brush and blot it well. Apply the gesso evenly all over the pages. For the SMILES page, I worked the gesso around the word, leaving it intact.
Let the gesso'd pages dry completely. Feel free to speed things up with a hair dryer...I do!
Although the photo is too small for you to see, the inside cover has the previous owner's name in it. I wonder what's happened to that person? Just another thing I love about old discarded books.
I've decided to leave the inside cover alone for now.
The SMILES pages are calling to me.
For some reason, I was directed to my waste basket which was recently filled with shredded paper.
So, not one to question why I'm inspired to root through trash, I grab a handful of shreds and I begin to glue them down.
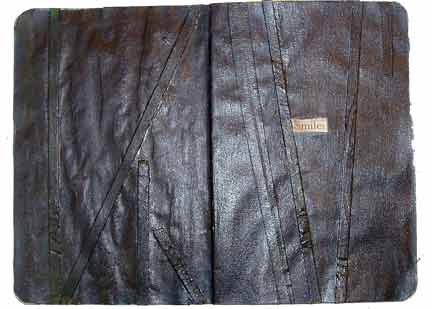
After the glue dried, I painted the pages and I ended up with a neat faux leather look. Totally accidental. I mixed Interference Orange, Micaceous Iron Oxide and Paynes Grey.
Learning how to make altered books is not that complicated, is it? :o)
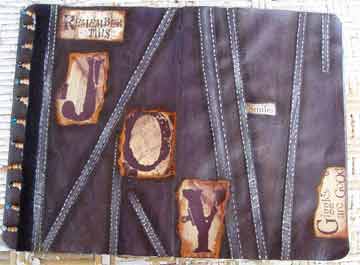
Well, there it is. The first completed page of my altered book.
I decided to stay with the faux leather look. So I painted stitches on the paper shreds and added shadows around them. I also dry-brushed a bit of paint on top of the strips to create highlights.
I picked out some letters and sayings and glued them into place. "Remember this: Giggles are Good".
Then I found a strip of beads which I glued in place on the left hand side. Ta da!!!!!
So that's how to make altered books...at least that's just one example. I'll have many more examples soon. I think I'll do a pocket page next. Here's how to make pockets in an altered book!
I hope you can see how much fun you can have altering books. The sky's the limit!
Here's where you can get back to the HOME page.
Want to ask me something? Here's where you can contact me!
While you're here it's a perfect opportunity to sign up for my free newsletter. Subscribe to The Creative Chronicles today!
You Can Paint These Trees and More

Get Your Video Course Now
Introductory Price
Save 30% plus
a Money Back Guarantee


You Can Paint These Trees and More
Get Your Video Course Now
Introductory Price
Save 30% plus
a Money Back Guarantee
Recent Articles
-
Earmark decorative painting studio in Ottawa! A cozy place to paint.
May 02, 26 03:28 PM
 Earmark decorative painting studio is a very comfortable and relaxing studio and classroom catering to all painting levels.Located in rural, scenic Ottawa.
 -
CBP0012 Funky Winter Chicken
Apr 14, 26 03:18 PM
 You'll get your funky dance on with my Funky Winter Chicken e-Pattern Packet. Detailed step-by-step instructions, line drawings, pictures and materials ensure your success with this project.
 -
CBP0045 Stained Glass Coasters Pattern Packet
Apr 14, 26 03:16 PM
 This faux Stained Glass Coasters Pattern Packet will provide you with hours of fun creating and using these coasters.
 -
CBP0005-Daisies at Dusk
Apr 14, 26 03:06 PM
 We all love daisies and you will love painting Daisies at Dusk. This decorative painting e-packet also known as a tole painting e-pattern has detailed step-by-step instructions, lots of pictures, mate…
 -
CBP0004-Get-Crackin
Apr 14, 26 03:03 PM
 Here's Get-Crackin, an advanced, trompe loeil pattern packet. You will love the results you get. Detailed step-by-step instructions and lots of pictures.
 -
CBP0002-hey-tiger
Apr 14, 26 02:57 PM
 CBP0002-hey-tiger is a beautiful Eastern Tiger Swallowtail butterfly
 -
CBP0028-High Realism Poppy Pattern Packet
Apr 14, 26 02:49 PM
 Enjoy CBP0028-High Realism Poppy Packet. This project is guaranteed to please. Settle into a quiet place, add layers and watch this poppy come alive.


Site Search
| site search by freefind | advanced |


You Can Paint These Trees and More
Get Your Video Course Now
Introductory Price
Save 30% plus
a Money Back Guarantee