- Home
- Milk Cans
- Antique Milk Can
- Antique Milk Can Part 2
Antique Milk Can
Part 2
As I write this page for the antique milk can part 2, the project featured here began about three weeks ago. Between getting some wintertime virus over the Holiday Season and attending dinner parties and so on, I'm finally getting back to the milk cans.
If you haven't seen the beginning of this project you can find it here.
Today, I spent about 4 hours on the main Sunflower. I'm counting the time spent choosing the colors and photographing the work in progress.


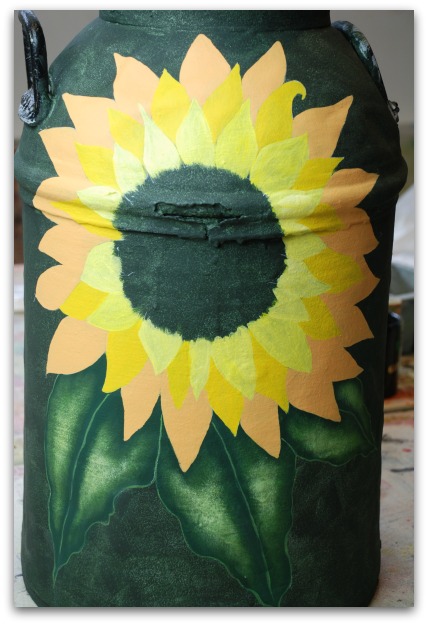
The first row of petals, next to the flower center was basecoated with a mix of Bright Yellow + Buttermilk. Bright Yellow is very transparent so by mixing it with a bit of Buttermilk it gave me the brightness I wanted but the opacity I needed. I did 2 coats.
The second row of petals was basecoated in Mustard Seed. I did 2 coats.
The outer petals were basecoated with Butterscotch.
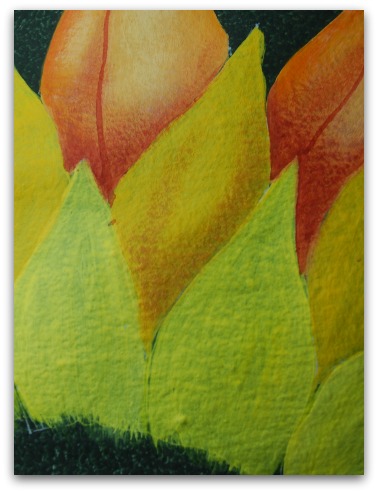
I wanted to give the leaves some shape so I dry brushed them first with Hauser Medium Green, followed by Hauser Light Green and then some Limeade. I like to use a 1/2" Domed Round with stiff bristles. To define the leaves, I loosely outlined them with Hauser Medium Green and I added the center veins with the same color.

Antique milk can part 2 continues!
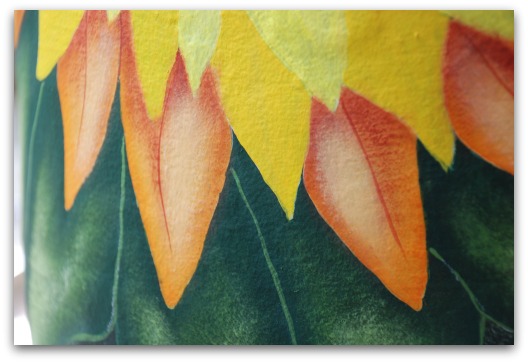
OUTER PETALS
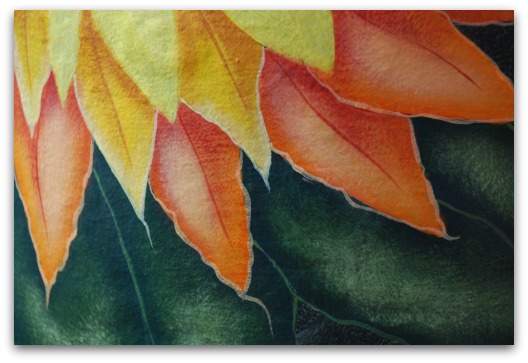
Using a flat oval blender, I dry brushed the base of the outer petals and one side of the center vein with Heritage Brick. Then I went back in and floated Heritage Brick in the deepest sections with a 5/8" Angle Shader.
 Working way too hard!!! :o)
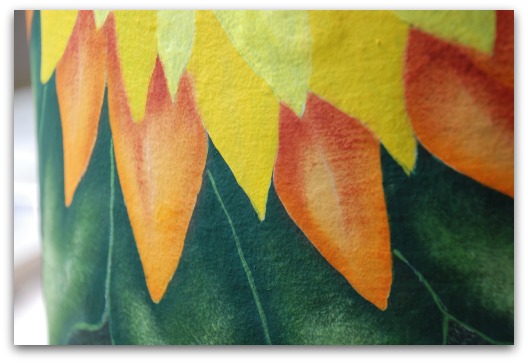 Floated Heritage Brink in the deepest sections of the outer petals.
Using the same brush, I did very wide floats of Spiced Pumpkin around the edges of the petals. The highlights are dry brushed with a mix of Orange Twist and tch White. The center veins is lined in with Heritage Brick. The petals are then loosely outlined with Orange Twist + White.
 Outer leaves almost completed. See the loose outlining in the second next photo.
SECOND ROW OF PETALS
I'm continuing on with the antique milk can part 2 project after a short coffee break...
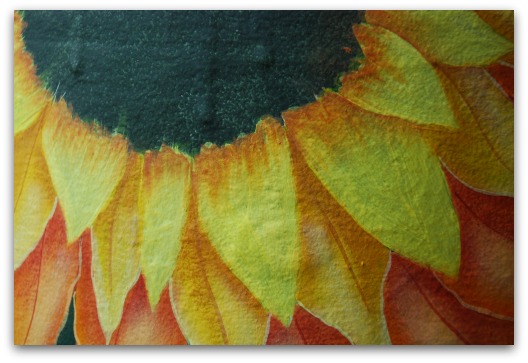
Using a flat oval blender, I dry brushed the base of the second row of petals and one side of the center vein with Traditional Raw Sienna. Then I went back in and floated Traditional Raw Sienna in the deepest sections with a 5/8" Angle Shader.
Using the same brush I floated a highlight of Bright Yellow + White mix around the edges of the petals. The highlight on the petals is dry brushed with mix of Bright Yellow + White. The petals are loosely outlined with the same yellow mix.
The center vein is Traditional Raw Sienna.
 Second row of petals completed.
THE FIRST ROW OF PETALS
Using the 5/8" Angle Shader, I shaded the base of each petal with Terra Cotta leaving choppy brush marks. Make the floats as wide as possible.
 Very choppy wide floats.
Using the same brush I floated a highlight of White + Bright Yellow mix around the edges of the petals. The highlight on the petals is dry brushed with mix of White + Bright Yellow. The petals are loosely outlined with the same yellow mix.
The center vein is Terra Cotta.
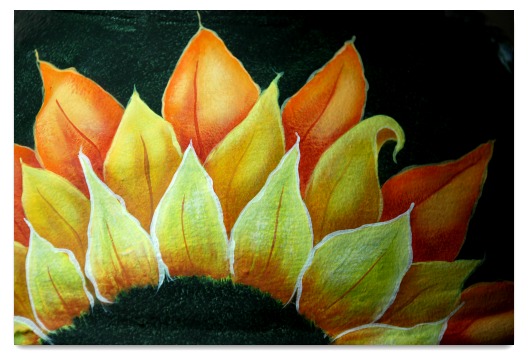 First row of petals completed.
SUNFLOWER CENTER
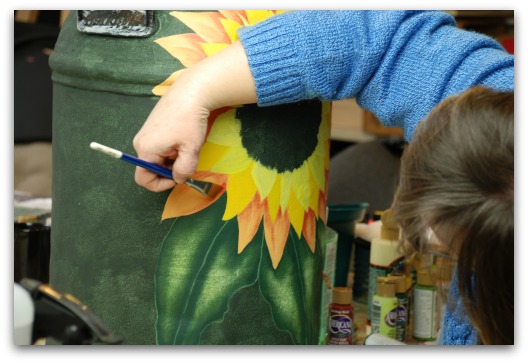
The antique milk can part 2 is turning out to be a lot of fun. Although I sometimes have to turn myself inside out while painting it. These milk cans are heavy and very awkward to move around.
Using a 1/2-inch Deerfoot, stipple in Burnt Umber.
Load the toe of the dirty brush with Traditional Raw Sienna and stipple around the center with the toe pointing inside. Pick up a little Bright Yellow on the toe to further highlight.
And now that part is done! The antique milk can part 2 leads to part 3.
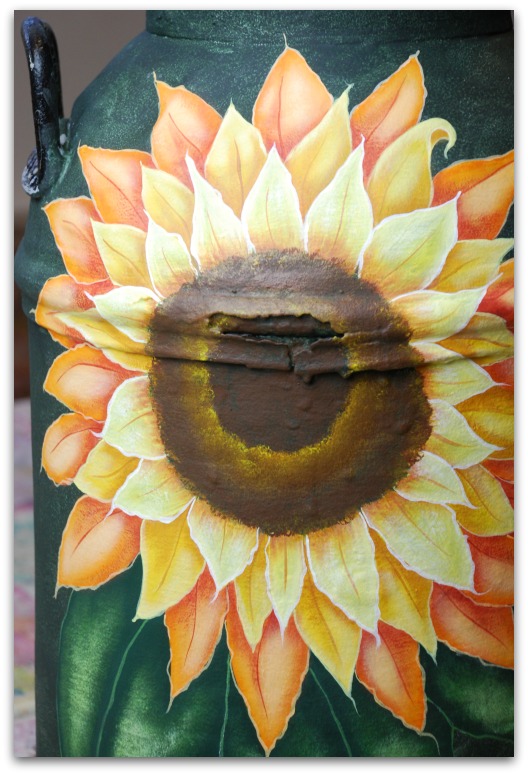 First Sunflower completed!
ANTIQUE MILK CAN PROJECT TO BE CONTINUED....
So, you may be taking notes and thinking about how you can do all of this. Don't worry, you will be able to follow my process and my progress as I continue to develop this antique milk can project. And I will publish a detailed step-by-step tutorial at the end of it all so you can paint your very own. As is true of all of my instructional material, it will include everything you need including line drawings, brush selections, paint colors... the works! Who knows... there may even be a video! How cool is that?
So that's it for the antique milk can part 2. Look for a link to part 3 down below.
And just in case you missed Part 1, here's where you can find the start of the antique milk can project.
And here's where you can see the project evolving in Part 3.
And here's where you can see the project evolving in Part 4.
And here's where you can see the FINAL results!
You Can Paint These Trees and More

Get Your Video Course Now
Introductory Price
Save 30% plus
a Money Back Guarantee


You Can Paint These Trees and More
Get Your Video Course Now
Introductory Price
Save 30% plus
a Money Back Guarantee
Recent Articles
-
Earmark decorative painting studio in Ottawa! A cozy place to paint.
May 02, 26 03:28 PM
 Earmark decorative painting studio is a very comfortable and relaxing studio and classroom catering to all painting levels.Located in rural, scenic Ottawa.
 -
CBP0012 Funky Winter Chicken
Apr 14, 26 03:18 PM
 You'll get your funky dance on with my Funky Winter Chicken e-Pattern Packet. Detailed step-by-step instructions, line drawings, pictures and materials ensure your success with this project.
 -
CBP0045 Stained Glass Coasters Pattern Packet
Apr 14, 26 03:16 PM
 This faux Stained Glass Coasters Pattern Packet will provide you with hours of fun creating and using these coasters.
 -
CBP0005-Daisies at Dusk
Apr 14, 26 03:06 PM
 We all love daisies and you will love painting Daisies at Dusk. This decorative painting e-packet also known as a tole painting e-pattern has detailed step-by-step instructions, lots of pictures, mate…
 -
CBP0004-Get-Crackin
Apr 14, 26 03:03 PM
 Here's Get-Crackin, an advanced, trompe loeil pattern packet. You will love the results you get. Detailed step-by-step instructions and lots of pictures.
 -
CBP0002-hey-tiger
Apr 14, 26 02:57 PM
 CBP0002-hey-tiger is a beautiful Eastern Tiger Swallowtail butterfly
 -
CBP0028-High Realism Poppy Pattern Packet
Apr 14, 26 02:49 PM
 Enjoy CBP0028-High Realism Poppy Packet. This project is guaranteed to please. Settle into a quiet place, add layers and watch this poppy come alive.


Site Search
| site search by freefind | advanced |


You Can Paint These Trees and More
Get Your Video Course Now
Introductory Price
Save 30% plus
a Money Back Guarantee