Antique Milk Can
I love old things. And decorating antique milk cans has been, and continues to be, a joy. Oh, don't get me wrong... it's a whole lot of work, they weigh a ton and are a very awkward surface to paint on. But once completed it's all so worth it.
Introducing... Earmark Creative Studio

A Little Trip Down Memory Lane
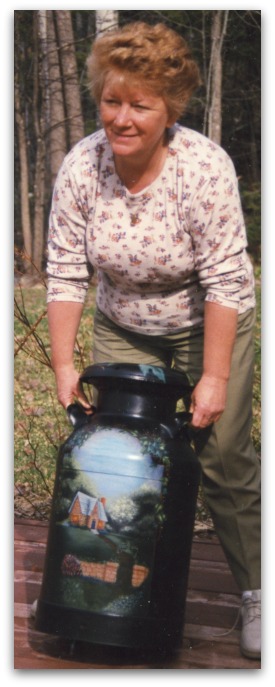
I adapted this Yvonne Kresal design to fit an antique milk can about 22 years ago. It's from her book Cottages From Pumpkin Ridge Painting Book #2. What a great book. Every project in the book is dreamy.
That's my Mom on the left proudly displaying her birthday gift!
She still has that antique milk can and there is not one chip or any damage on it even though it's located in a high traffic area.
Keep reading for how I prepare and protect my artwork on metal...
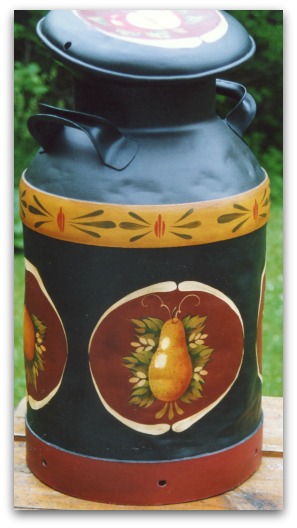
And on the right is a folk art design on an antique milk can I painted for a client about 20 years ago.
The design is by Mary Jane Todd. I enlarged it from the original a whole lot!
I don't remember which book or which design packet it came from but anything by Mary Jane Todd rocks my socks! I believe it was originally meant for a set of coasters with a matching box... it was a long time ago.
And there have been many more antique milk cans that I've painted but now I'm all excited about my
newest project.
I got a call from a woman wanting to get 2 milk cans painted. The previous artist she had commissioned left her disappointed... as she said to me, "even my young son could have done a better job". This usually sends up a huge red flag for me but this woman struck me as being a very direct person, who knows what she wants and is going to get it. I like that!
So after settling on details, expectations, price and a serious non-refundable deposit, we agreed to work together.
These 2 milk cans will be focal pieces in an elaborate garden featuring a prominent waterfall. The milk cans will be placed at the top of the falls, one on each side. I see the design consisting of large sunflowers in yellows and golds and mauves... filler flowers of Black Eyed Susans and Daisies as well as frolicking butterflies, dragonflies and insects. I am on fire with ideas.
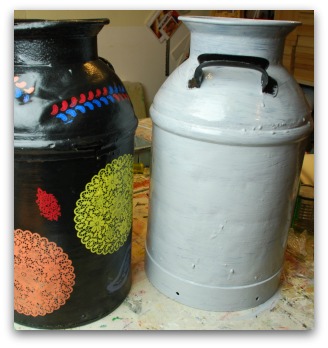
A while back, the antique milk cans were delivered to me by my client. I have to say they are pretty banged up. My client painted them over in black with doily stencils to cover up the other artist's work and well... let's just say there's much to be done! But I see this as a glorious opportunity to be creative. It's what I do!!
Oh, and as a bonus, my client brought her beautiful German Shepherd along for the ride. So I got my doggie fix as well!
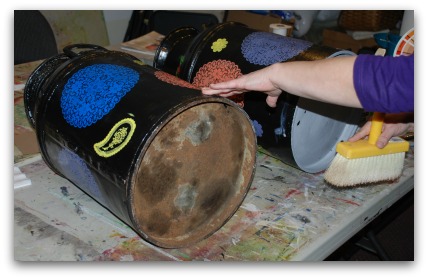
I checked the milk cans for structural soundness and although they were a bit rough looking, the exterior was pretty sound. However, when I placed them on their sides and inspected the bottoms, I noticed there was not much metal left in the bases. There are holes right through the metal which was never properly primed for rust inhibition. I advised my client that this should be addressed and she agreed that I should prepare the bases as well.
I cleaned off the mud, insect cocoons and other debris from the base. The clumps of mud made the metal quite damp in some places so I had to let the cans dry overnight.
The next day I washed the milk cans in warm soapy water, rinsed and dried them thoroughly. I used my hair dryer to ensure every nook and cranny was completely dry.
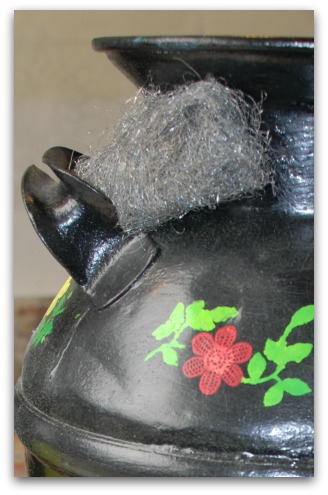
Next I rubbed coarse steel wool all over every inch of the
milk cans. Then working one small
section at a time I sprayed on rubbing alcohol to remove any remaining dirt and
fragments of steel wool. I made a mess
of my work table so I wiped it all down too. Remember this! When working with steel wool, always wear protective gloves. That stuff can really get under your skin.
PRIMING
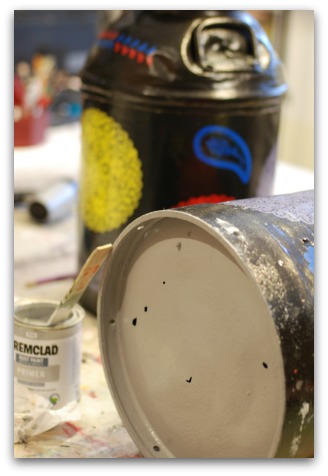
Using a scruffy old brush, I painted Tremclad® Waterbased Metal Primer on the bases. I used the blow dryer to dry and set it before turning the milk cans right side up.
I applied one coat of Tremclad® all over both milk cans EXCEPT for the handles. Why not the handles? You need the handles so you can move the cans around while things are wet. And they each weigh a lot!
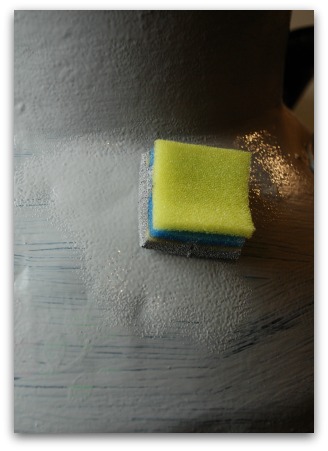
The milk cans have some unwanted texture that I don't want
to show up in my work... like the doilies and some strong brush marks. Soooo... I applied a second coat of the
Tremclad® with a petit four sponge. You
can use a makeup sponge brush to achieve a similar effect. By sponging on the Tremclad® I'm creating a
unifying egg shell texture. It won't
correct everything but it helps prepare the surface by hiding the big flaws. And as we all know, good surface preparation is essential for a great finished piece. I
allowed everything to dry and cure overnight. Don't rush this drying step. It really needs the time to cure.
Doodles to Drawings
So now for a design... You will remember that my client certainly has high standards and knows what she wants. I have learned that it is important to involve your client as early as possible in the design. Neither she nor I want surprises. So I sketched the design idea, made images of the designs and emailed them to my client. I added to that, a description of my vision for the project. My client's response? She loved it saying: "That's EXACTLY what I'm looking for!". Okay now I'm good to go.
So here's what I did. I measured the circumference of one of the milk cans and proceeded to cut out a sheet of tracing paper that size. I buy my tracing paper by the roll. It's more economical and it's great for large projects.
I looked around the studio for various sized jar lids to use as sunflower center templates and randomly made circles on the paper. Next I free-handed an array of different style petals. I'm starting with the main flowers as my focal point and I'll add filler details along the way. I rarely plan out a painting from start to finish, although I do have the essence of what it will look like in the end in my head.
BASECOATING
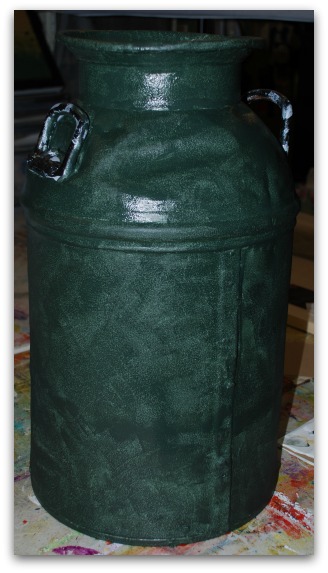
So here's how I am going to proceed. I'm going to concentrate on painting one milk can at a time. I chose a very dark green for the background. I want the flowers to really stand out and this will be good contrast. I sponged on Midnite green with the petit four sponge. I did just one coat. It doesn't provide solid coverage but most of the can will be painted over with lots of flowers, so I'm not concerned.
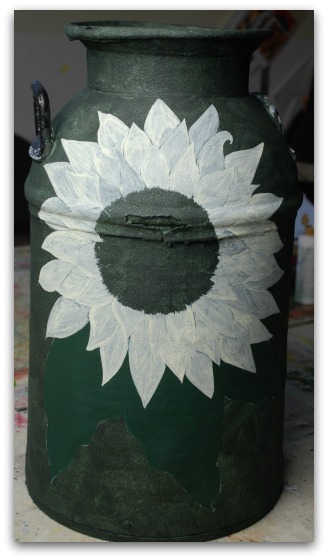
I transferred the largest sunflower and positioned the flower center over a particularly rusted out area. I did that knowing that the centre of the flower will be either visually or physically textured (haven't decided yet), which will take the eye away from the rusted out section.
Next I basecoated the large leaves with Dark Forest Green. And I also undercoated each petal with Buttermilk.
ANTIQUE MILK CAN PROJECT TO BE CONTINUED....
Here is part 2 of the antique milk can project!
Here is part 3 of the antique milk can project!
Here is part 4 of the antique milk can project!
And here are the FINAL results.
Okay, it's time to leave our antique milk can and head back to the studio.
You Can Paint These Trees and More

Get Your Video Course Now
Introductory Price
Save 30% plus
a Money Back Guarantee


You Can Paint These Trees and More
Get Your Video Course Now
Introductory Price
Save 30% plus
a Money Back Guarantee
Recent Articles
-
Earmark decorative painting studio in Ottawa! A cozy place to paint.
May 02, 26 03:28 PM
 Earmark decorative painting studio is a very comfortable and relaxing studio and classroom catering to all painting levels.Located in rural, scenic Ottawa.
 -
CBP0012 Funky Winter Chicken
Apr 14, 26 03:18 PM
 You'll get your funky dance on with my Funky Winter Chicken e-Pattern Packet. Detailed step-by-step instructions, line drawings, pictures and materials ensure your success with this project.
 -
CBP0045 Stained Glass Coasters Pattern Packet
Apr 14, 26 03:16 PM
 This faux Stained Glass Coasters Pattern Packet will provide you with hours of fun creating and using these coasters.
 -
CBP0005-Daisies at Dusk
Apr 14, 26 03:06 PM
 We all love daisies and you will love painting Daisies at Dusk. This decorative painting e-packet also known as a tole painting e-pattern has detailed step-by-step instructions, lots of pictures, mate…
 -
CBP0004-Get-Crackin
Apr 14, 26 03:03 PM
 Here's Get-Crackin, an advanced, trompe loeil pattern packet. You will love the results you get. Detailed step-by-step instructions and lots of pictures.
 -
CBP0002-hey-tiger
Apr 14, 26 02:57 PM
 CBP0002-hey-tiger is a beautiful Eastern Tiger Swallowtail butterfly
 -
CBP0028-High Realism Poppy Pattern Packet
Apr 14, 26 02:49 PM
 Enjoy CBP0028-High Realism Poppy Packet. This project is guaranteed to please. Settle into a quiet place, add layers and watch this poppy come alive.


Site Search
| site search by freefind | advanced |


You Can Paint These Trees and More
Get Your Video Course Now
Introductory Price
Save 30% plus
a Money Back Guarantee