- Home
- Milk Cans
- Antique Milk Can
- Antique Milk Can Part 4
Antique Milk Can
Part 4
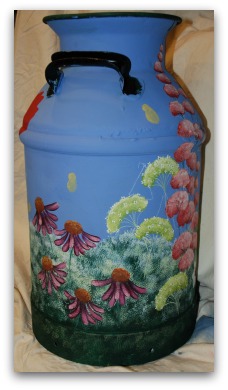
Here's antique milk can part 4 of the project. I was in a doodling state of mind at the time and rather than sketch out a drawing to work from, I just decided to wing it directly on the milk can. Brazen, I know!!!
Of course at first I had the whole thing sponged on with the dark green as I had done in Part 1 of the project but something compelled me to do a bright and sunny, completely different milk can than the first one. Call me crazy but I always follow my instincts or as I like to call it, my Creative Spirit. I don't mean that in a "woo-woo" way.
I didn't have the good sense to take photos early on in the progress because I really was swept away and playing "in the moment". It was so much fun to just let go and to play.
A few months prior to painting this, I taught a design by Kathye Langdon, CDA. This definitely influenced the design of this milk can and for that reason there will not be any instructional material for this project.
Although it's a free hand adaptation from the original design its resemblance is much too blatant to call my own. I am very respectful of copyright. And many of the other elements are my very own. Still, give credit where credit is due!
Check through some of your old decorative painting magazines and look for a project named "It's a Bug's Life".
Anyhow, let's look at antique milk can part 4!

Antique Milk Can Part 4 Continues...
There still remains much to do but I wanted to share the progress so far. I should be finished in the next few days.
I definitely need to add little garden critters to pull it all together.
I have to remind myself to erase my chalk pencil marks. Gosh, how many times have you varnished over chalk or graphite lines? For me, far too many times!
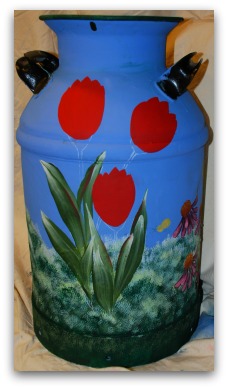
These are my own free-handed tulips which are obviously not finished. I'm contemplating adding Black Eyed Susans and maybe some Lilacs. We'll see! I do like the cluster of daisies shown below and may tuck in a few more here and there.

So there you have it! Once I get all the critters and filler flowers in place, I'll be painting the handles. Then applying 3 coast of exterior varnish with UV protection. And finally adding paste wax for a durable outdoor finish. More on that in the last installment coming very soon.
If you haven't seen Part 1 of this project, here it is. And if you missed Part 2, check it out here. And of course, here's Part 3. And here are the FINAL results!!
I hope you enjoyed the antique milk can part 4 part of the project!
Let's go back to the HOME page.
You Can Paint These Trees and More

Get Your Video Course Now
Introductory Price
Save 30% plus
a Money Back Guarantee


You Can Paint These Trees and More
Get Your Video Course Now
Introductory Price
Save 30% plus
a Money Back Guarantee
Recent Articles
-
Earmark decorative painting studio in Ottawa! A cozy place to paint.
May 02, 26 03:28 PM
 Earmark decorative painting studio is a very comfortable and relaxing studio and classroom catering to all painting levels.Located in rural, scenic Ottawa.
 -
CBP0012 Funky Winter Chicken
Apr 14, 26 03:18 PM
 You'll get your funky dance on with my Funky Winter Chicken e-Pattern Packet. Detailed step-by-step instructions, line drawings, pictures and materials ensure your success with this project.
 -
CBP0045 Stained Glass Coasters Pattern Packet
Apr 14, 26 03:16 PM
 This faux Stained Glass Coasters Pattern Packet will provide you with hours of fun creating and using these coasters.
 -
CBP0005-Daisies at Dusk
Apr 14, 26 03:06 PM
 We all love daisies and you will love painting Daisies at Dusk. This decorative painting e-packet also known as a tole painting e-pattern has detailed step-by-step instructions, lots of pictures, mate…
 -
CBP0004-Get-Crackin
Apr 14, 26 03:03 PM
 Here's Get-Crackin, an advanced, trompe loeil pattern packet. You will love the results you get. Detailed step-by-step instructions and lots of pictures.
 -
CBP0002-hey-tiger
Apr 14, 26 02:57 PM
 CBP0002-hey-tiger is a beautiful Eastern Tiger Swallowtail butterfly
 -
CBP0028-High Realism Poppy Pattern Packet
Apr 14, 26 02:49 PM
 Enjoy CBP0028-High Realism Poppy Packet. This project is guaranteed to please. Settle into a quiet place, add layers and watch this poppy come alive.


Site Search
| site search by freefind | advanced |


You Can Paint These Trees and More
Get Your Video Course Now
Introductory Price
Save 30% plus
a Money Back Guarantee