PAINTING BATHROOM CABINETS
A Great Project for the Do-It-Yourself Nut!
Let's just say I love to make things over. So for me, painting bathroom cabinets was inevitable.
My bathroom makeover had to be affordable. And the goal was to make the room more elegant and up-to-date.
The original vanity, at one time, was made of a very dark oak. In time I painted it white just because the dark wood was too much for such a small space...plus, well, it was brown. But even white got to be boring very quickly.
What's the Best Way
to Paint Bathroom Cabinets?
Follow these easy steps and you too can transform your bathroom!
· Remove drawers and hardware. Wash the drawer with TSP. Rinse thoroughly and dry. Put them aside somewhere you won’t be tripping over them. Keep the screws and hardware together in a zip top plastic bag.
· Remove doors one at a time and mark the backs so you know if it’s the middle door, or right side or left side. Remove all the hardware and hinges. Wash the doors with TSP. Rinse thoroughly and dry. Keep the screws, hardware and hinges together in a zip top plastic bag.
· Wash the shell of the cabinet inside as well as outside with the TSP. Rinse thoroughly and dry.
· I used a very strong alkyd primer to ensure great adhesion. Please read precautions below.
· First, if the cabinet is touching a wall, mask off the wall with painter’s tape to protect it. Also protect the lip of the counter with painter's tape.
· Starting with the cabinet shell, apply primer with a small foam roller, cutting in with a 1-inch brush in the corners when necessary.
· If your cabinet doors are plain, simply apply the primer with the roller.
· If your cabinet doors have raised panels or trim, use the brush to cut into the areas that the roller can’t reach.
· Do the same for the drawer fronts.
· If you used an alkyd primer, you’ll need mineral spirits to clean your tools. If you used a latex primer, simply wash with soap and water.
· I let the primer dry at least 12 hours or overnight.
· Using the same tools, and in the same order, apply your choice of paint color.
Introducing... Earmark Creative Studio

Precautions!!
If you don’t have adequate ventilation, please wear an aspirator.
The fumes can be overwhelming.
Open a window or turn on the ceiling fan.
Go outside for small breaks and get some fresh air.
Keep children and pets safe by keeping them away.
Read the health warnings on the products you're using.
Painting Bathroom Cabinets
Gets a Bit More Exciting.
For my latest project, painting bathroom cabinets, I really wanted to go all out. As a professional decorative artist, I wanted to play with faux finishes and simple embellishments.
The techniques I wanted to explore had to be do-able for the first timer.
Here's how I took my project for painting a bathroom vanity and jazzed it up a notch or two! Trust me, you can do this.
Here's how you can do your own stenciling plaster.
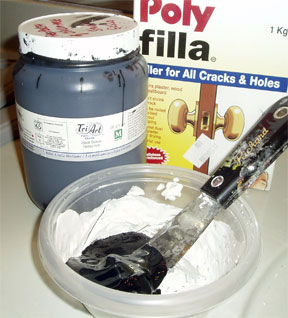
First, mix up some filler following the instructions on the box. I used Poly Filla because it's readily available and inexpensive.
I tinted the filler with Black gesso. You could leave it un-tinted or mix in some other artist grade acrylic paint to achieve a color more suitable to you scheme. Mix it all up very thoroughly.
Make sure the doors are positioned right side up so that when you re-install the doors, your design won't be upside down.
Why do I give you this advice? Because I had 2 of the 3 doors done before I realized they were in the wrong position. Arg!!!!!! And I've had lots of experience painting bathroom cabinets!
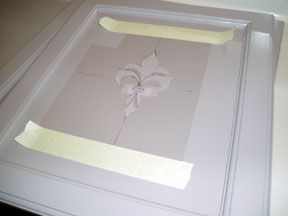
Find the center of the door and make light registration marks using a chalk pencil.
Using a stencil of your choice (I cut my own stencil from a transparency sheet), line up the registration marks and tape the stencil in place.
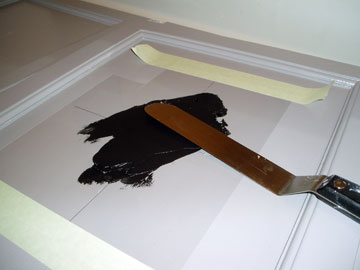
Using a palette knife, smear a film of filler over the stencil. Don't push too hard or you'll have filler seeping under the stencil.
Carefully lift off the stencil.
Wash it gently in cool running water and clean your palette knife too.
Dry the stencil thoroughly, and repeat with any other remaining cabinet doors.
Here's how my stencil turned out.
One of my applications was a mess, so I simply wiped it off quickly. Then I tried again.
I had a little bleed-under which I quickly cleaned with a bit of spit on a cotton swab. :o) You didn't know that spit was important for painting bathroom cabinets, did you? Stick with me, I'll teach you all sorts of stuff! Bwahahah!!!
Here you can see 2 of the cabinet doors.
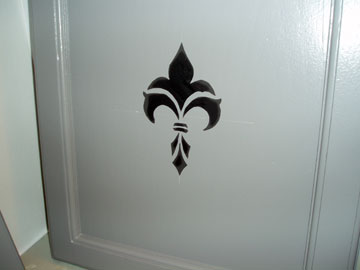
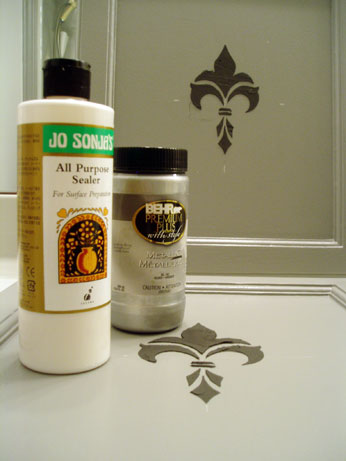
Notice how the stenciled area is raised and textured. Once the plaster dried completely, I applied an All Purpose Sealer to the plaster. Once that was dry I had a little more fun.
Time for Some Silver Highlights!
Using Behr Premium Plus With Style, No. 743 Silver. I used a domed round brush to dry-brush the stenciled plsater to bring out all of the gorgeous texture.
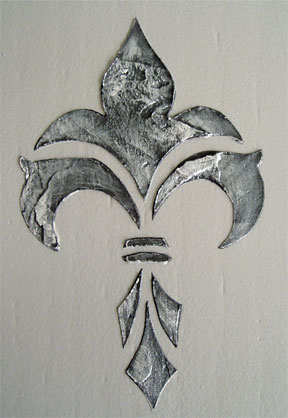
Here's a look at the metallic finish on the raised plaster. Looks really neat, huh?
Well that's it for painting bathroom cabinets for now.
If you have any questions you can contact me here.
If you want to keep up with what's going on why not sign up for my free newsletter? Here's where yo can get The Creative Chronicles today!
Let's get back to the HOME page.
You Can Paint These Trees and More

Get Your Video Course Now
Introductory Price
Save 30% plus
a Money Back Guarantee


You Can Paint These Trees and More
Get Your Video Course Now
Introductory Price
Save 30% plus
a Money Back Guarantee
Recent Articles
-
Earmark decorative painting studio in Ottawa! A cozy place to paint.
May 02, 26 03:28 PM
 Earmark decorative painting studio is a very comfortable and relaxing studio and classroom catering to all painting levels.Located in rural, scenic Ottawa.
 -
CBP0012 Funky Winter Chicken
Apr 14, 26 03:18 PM
 You'll get your funky dance on with my Funky Winter Chicken e-Pattern Packet. Detailed step-by-step instructions, line drawings, pictures and materials ensure your success with this project.
 -
CBP0045 Stained Glass Coasters Pattern Packet
Apr 14, 26 03:16 PM
 This faux Stained Glass Coasters Pattern Packet will provide you with hours of fun creating and using these coasters.
 -
CBP0005-Daisies at Dusk
Apr 14, 26 03:06 PM
 We all love daisies and you will love painting Daisies at Dusk. This decorative painting e-packet also known as a tole painting e-pattern has detailed step-by-step instructions, lots of pictures, mate…
 -
CBP0004-Get-Crackin
Apr 14, 26 03:03 PM
 Here's Get-Crackin, an advanced, trompe loeil pattern packet. You will love the results you get. Detailed step-by-step instructions and lots of pictures.
 -
CBP0002-hey-tiger
Apr 14, 26 02:57 PM
 CBP0002-hey-tiger is a beautiful Eastern Tiger Swallowtail butterfly
 -
CBP0028-High Realism Poppy Pattern Packet
Apr 14, 26 02:49 PM
 Enjoy CBP0028-High Realism Poppy Packet. This project is guaranteed to please. Settle into a quiet place, add layers and watch this poppy come alive.


Site Search
| site search by freefind | advanced |


You Can Paint These Trees and More
Get Your Video Course Now
Introductory Price
Save 30% plus
a Money Back Guarantee