Painted Shoes

Hand painted shoes are so much fun to do. As some of you know, I have recently become addicted to gardening. I love digging in the dirt and planting and weeding and everything else.
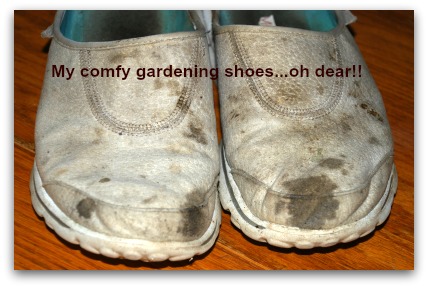
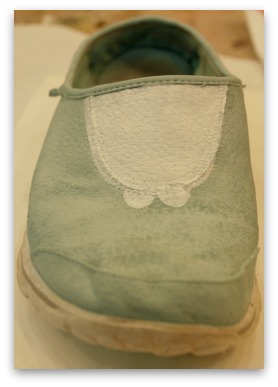
I didn't realize that I had made such a mess of my favorite slip-ons! These Sketchers have "memory foam insoles" and they are so comfy. I tried cleaning them but as you can see from the image below, my efforts were useless.
Introducing... Earmark Creative Studio

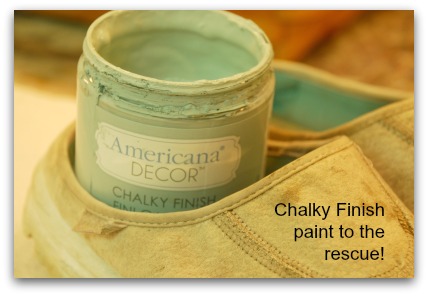
I was pretty sure I'd be throwing them out. But then I got to thinking about the great properties of Americana® DECOR™ Chalky Finish paint. Would they work on my Sketchers?
So I trotted off to the studio to see what would happen if I painted them.
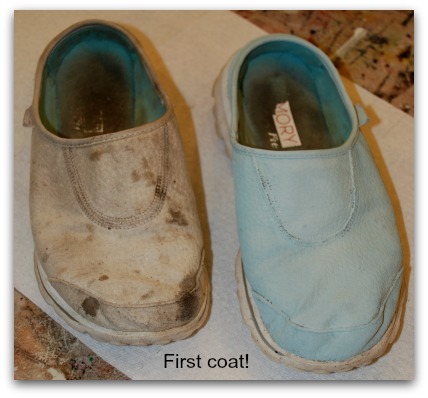
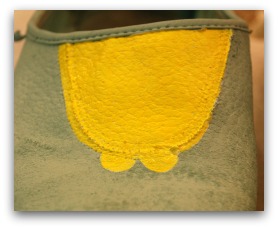
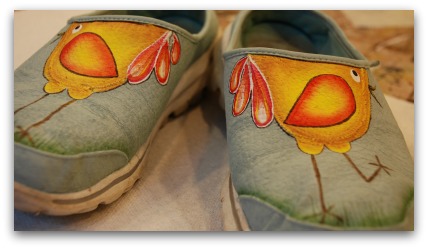
Here's what just one coat of the color "Vintage" did. You have to really push the paint in. My shoes are a sort of faux leather / suede.
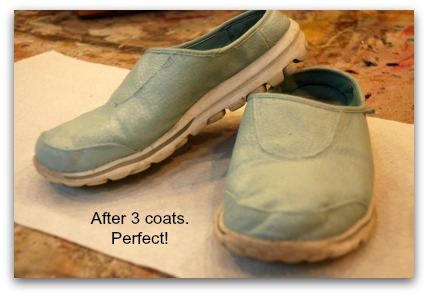
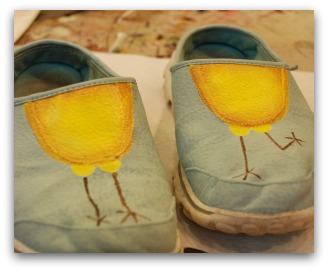
I did 3 coats letting each layer dry completely. Now, I could have stopped here and just sprayed them with ScotchGuard™ Fabric Protector and I'd have new looking shoes. BUT, see that stitched upper part of the shoes... the sort of half circle? I think it's called a "vamp" in shoe lingo.
Anyway, I thought it looked like a funky bird. So that's what happened. That's how I ended up painting silly birds on my shoes!
Just in case you're a little crazy like me, here's what I did, using DecoArt acrylics.
I sketched out a quick design of a bird. You can download the line drawing here.
I transferred the bird body shape and top of legs over the vamp and undercoated it with Warm White.
When it was dry, I basecoated it with Cadmium Yellow. Allowed that to dry.
I used a #16 flat shader to float a shadow around the inside of the body with Honey Brown.
I added the legs using a #1 liner with Burnt Umber.
I also shaded the tops of the legs where they meet the body using Honey Brown.
I used the liner to add the beak with Burnt Umber and added a small line of Honey Brown to suggest a highlight.
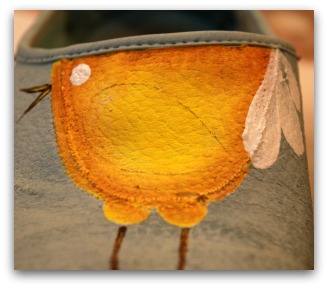
The wing was traced on.
With Warm White, I used a #5 round brush to create the 3 comma strokes making up the tail. I used the handle of the brush to dot a Warm White eye. Let everything dry. Tee hee!! Painted shoes! Who would have thought?!
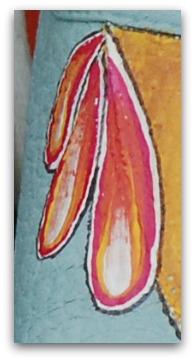
With Cinnamon Drop, I floated all the way around the inside of the wing.
I also floated a bit of Evergreen above the stitch line to suggest a bit of grass and I added a few wispy blades of grass using the liner.
The tail feathers are then overstroked first with Cinnamon Drop, then Cadmium Orange, followed by Cadmium Yellow and then White. You want to allow each previous color to show through so the strokes need to be smaller and smaller as shown in the detail below.
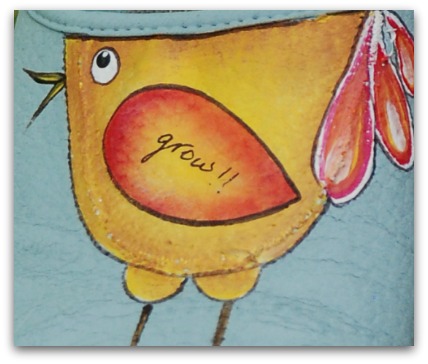
Finish by outlining everything in Black using the liner. Add a pupil with a small dot of Black then when dry a tiny Warm White dot for the shine in the eye.
Use a permanent fine tipped marker, like a Sharpie, to write the word "grow!!" on the wing.
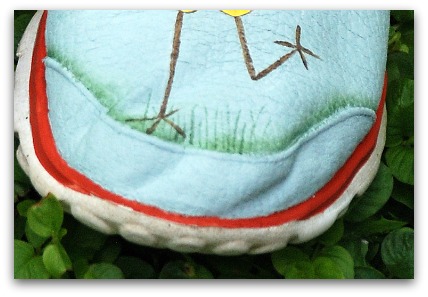
I used "Cameo" Americana® DECOR™ Chalky Finish paint to trim the edge of my shoes.
So that's how I spent a part of my day! It really is fun to do hand painted shoes.
Now it's time to protect all this work with the ScotchGuard™ Fabric Protector.
For your shopping convenience I've provided links to some of the supplies I used for this project. Of course there's no obligations to buy anything. If you do, I will earn a tiny commission that will allow me to continue with my gardening addiction! :o)
I hope you enjoyed this impromptu little project and that it made you smile.
OK... now let's go from the painted shoes page back to the HOME page.
You Can Paint These Trees and More

Get Your Video Course Now
Introductory Price
Save 30% plus
a Money Back Guarantee


You Can Paint These Trees and More
Get Your Video Course Now
Introductory Price
Save 30% plus
a Money Back Guarantee
Recent Articles
-
Earmark decorative painting studio in Ottawa! A cozy place to paint.
May 02, 26 03:28 PM
 Earmark decorative painting studio is a very comfortable and relaxing studio and classroom catering to all painting levels.Located in rural, scenic Ottawa.
 -
CBP0012 Funky Winter Chicken
Apr 14, 26 03:18 PM
 You'll get your funky dance on with my Funky Winter Chicken e-Pattern Packet. Detailed step-by-step instructions, line drawings, pictures and materials ensure your success with this project.
 -
CBP0045 Stained Glass Coasters Pattern Packet
Apr 14, 26 03:16 PM
 This faux Stained Glass Coasters Pattern Packet will provide you with hours of fun creating and using these coasters.
 -
CBP0005-Daisies at Dusk
Apr 14, 26 03:06 PM
 We all love daisies and you will love painting Daisies at Dusk. This decorative painting e-packet also known as a tole painting e-pattern has detailed step-by-step instructions, lots of pictures, mate…
 -
CBP0004-Get-Crackin
Apr 14, 26 03:03 PM
 Here's Get-Crackin, an advanced, trompe loeil pattern packet. You will love the results you get. Detailed step-by-step instructions and lots of pictures.
 -
CBP0002-hey-tiger
Apr 14, 26 02:57 PM
 CBP0002-hey-tiger is a beautiful Eastern Tiger Swallowtail butterfly
 -
CBP0028-High Realism Poppy Pattern Packet
Apr 14, 26 02:49 PM
 Enjoy CBP0028-High Realism Poppy Packet. This project is guaranteed to please. Settle into a quiet place, add layers and watch this poppy come alive.


Site Search
| site search by freefind | advanced |


You Can Paint These Trees and More
Get Your Video Course Now
Introductory Price
Save 30% plus
a Money Back Guarantee