PAINTED WOOD
A Flawless Background

A painted wood background in decorative painting is known as basecoating.
If you keep the following points in mind, we know you'll be pleased with the end result. Keep and eye on this plain wood coaster as it goes through the preparation stages.
Just for the record, we've never met a bottle of acrylic paint that didn't need some thinning before using it. So here's the deal...
The Right Paint Consistency

Once you squeeze some paint on your palette, just brush-mix a little water into the paint to create the right consistency. If the paint is creating ridges or seems to drag on the surface, it's still too thick. If on the other hand it's transparent or it puddles, then it's too watered down.
You know you have the right consistency when the paint glides on
the surface. It's important that your painted wood remains nice and
smooth as you apply the paint.
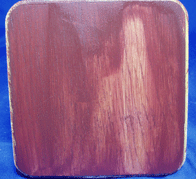
Notice the paint on the left-hand side of the coaster is too thick. On
the right-hand side it's too thin.
If you work quickly and resist the urge to keep painting over the same
area while it's wet, you'll end up with a smooth basecoat. And keep an
eye out for lumps and bumps... the occasional pet hair is OK... :o) but
if it bugs you, wait for the paint to dry and pick it off with a
straight pin.
Introducing... Earmark Creative Studio

Don't Rush!
Painting wood requires a little patience. As much as we may want them to... bottled acrylic paints rarely, if ever, cover in just one coat. Two to three smooth, even coats are often needed. You can't just rush perfection. And do allow each coat to dry thoroughly before applying the next. That way you won't have to deal with lifting paint in your painted wood surface.
This example shows where the paint has lifted.
Use a Wide Brush
We recommend using a dampened sponge brush or a wide flat brush to apply paint.
Long, even strokes in the direction of the wood grain are best.
Sanding between coats makes for a very smooth finish, but it's not usually necessary. Some painters find it helpful to use a piece of brown paper bag rather than sandpaper.
The Perfect Basecoat
Unless otherwise specified, the ideal painted wood background should be smooth but still have some "tooth".
There is a certain fine texture that comes from your basecoating brush.
Keep in mind too that sanding to a polished smoothness will make the surface too slick.
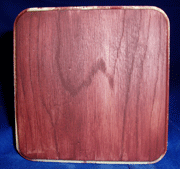
The sample here demonstrates a good FIRST basecoat. It's not too transparent and there are no ridges.
And finally...
It may seem like a lot to think about.
But if you follow these steps each time you're painting wood, then good basecoating habits will become second nature to you.
You may contact us here if you have any questions or if you have tips and ideas you'd like to share with us. We love getting your e-mails!
But don't leave our site just yet...
Let's leave Painted Wood and go to Wood Finishes.
Return to our Decorative Painting Home Page.
You Can Paint These Trees and More

Get Your Video Course Now
Introductory Price
Save 30% plus
a Money Back Guarantee


You Can Paint These Trees and More
Get Your Video Course Now
Introductory Price
Save 30% plus
a Money Back Guarantee
Recent Articles
-
Earmark decorative painting studio in Ottawa! A cozy place to paint.
May 02, 26 03:28 PM
 Earmark decorative painting studio is a very comfortable and relaxing studio and classroom catering to all painting levels.Located in rural, scenic Ottawa.
 -
CBP0012 Funky Winter Chicken
Apr 14, 26 03:18 PM
 You'll get your funky dance on with my Funky Winter Chicken e-Pattern Packet. Detailed step-by-step instructions, line drawings, pictures and materials ensure your success with this project.
 -
CBP0045 Stained Glass Coasters Pattern Packet
Apr 14, 26 03:16 PM
 This faux Stained Glass Coasters Pattern Packet will provide you with hours of fun creating and using these coasters.
 -
CBP0005-Daisies at Dusk
Apr 14, 26 03:06 PM
 We all love daisies and you will love painting Daisies at Dusk. This decorative painting e-packet also known as a tole painting e-pattern has detailed step-by-step instructions, lots of pictures, mate…
 -
CBP0004-Get-Crackin
Apr 14, 26 03:03 PM
 Here's Get-Crackin, an advanced, trompe loeil pattern packet. You will love the results you get. Detailed step-by-step instructions and lots of pictures.
 -
CBP0002-hey-tiger
Apr 14, 26 02:57 PM
 CBP0002-hey-tiger is a beautiful Eastern Tiger Swallowtail butterfly
 -
CBP0028-High Realism Poppy Pattern Packet
Apr 14, 26 02:49 PM
 Enjoy CBP0028-High Realism Poppy Packet. This project is guaranteed to please. Settle into a quiet place, add layers and watch this poppy come alive.


Site Search
| site search by freefind | advanced |


You Can Paint These Trees and More
Get Your Video Course Now
Introductory Price
Save 30% plus
a Money Back Guarantee