Inkjet Image Transfer

Here's an easy inkjet image transfer tutorial. For this project I used a simple MDF plaque as my surface. You could do this on light colored wood or a light colored painted surface or even in a journal! Any surface that is porous will work.
What you'll need:
An image you like
Inkjet printer
Multi-use printer paper (white)
Porous surface of your choice
Gloss Gel Medium (Golden brand)
Foam brush or old 1-inch Flat brush
Palette knife (optional)
Bone folder or old credit card
Water basin
Old facecloth
Metallic paint (optional)
Gloss varnish
Print of a favorite quote (optional)
1. Select a photo.

Here I've chosen a photo I took of a rose.

2. Then use a photo editor to "mirror or reverse" the image. The reason you need to reverse the image is because it's going to be placed face down onto the surface as opposed to being glued on facing up. So if there's lettering in your photo or your Auntie Mae has a large mole on the right side of her chin, it would look odd if the image came out looking backwards.
3. If necessary, re-size the image to fit your surface.
4. Using an ink jet color or black and white printer, on a white sheet of printer paper, print out your image twice, just in case you mess up the first one.
5. If necessary, trim the print removing the white border.
6. Apply a generous coat of Gloss Gel Medium to your surface (not the print) using a
foam brush or soft bristle brush. Make sure to spread it out evenly to get rid of any thick ridges. The gel will appear white or foggy.

7. While the gel is wet, carefully place the print face down into the wet gel. Make sure it's lined up properly because once it makes contact you can't be wiggling the print around. That would cause the ink to smear.
8. Smooth out the back of the print with your fingers. Avoid getting the gel medium onto the back of the print.
9. Use an old credit card or bone folder to gently burnish the back of the print. Don't press too hard or you'll tear the paper.
Here you can see the faint image of the rose coming through.
10. Wait 8 hours for it to dry. Seriously. Don't be impatient.
While you're waiting you may as well print out some more images to transfer!! What the heck!

OK, so now the paper has dried. Time for the big reveal.
Wet the back of the print with a soft face cloth. Let the print sit wet for a couple of minutes.


Now gently rub the back of the print. The paper will begin to pill and pull off. Be gentle.
Continue until the image is completely revealed.

Here's what it looks like after the transfer has dried. It needs to be moistened again and gently rubbed some more.

As you can see the image is clearer now.

At this stage let it dry completely before varnishing with one coat of gloss varnish. This will make the image much more visible. Allow to dry completely.

Use the back of a palette knife to spread on some metallic gold paint covering the exposed wood. This will "frame" the image.
At this point you can add another coat of varnish and call it done.
Or you can further embellish it with stencils or rubber stamps or add words as I did.
To add text use the same inkjet image transfer method.

Remember to mirror the lettering!!!
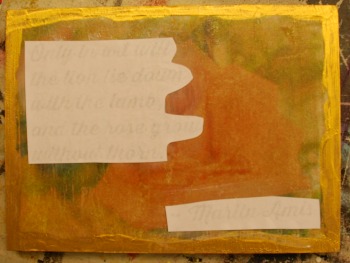
Apply the gel medium where you want to add the text and burnish. Let dry 8 hours and remove the paper with water.
Using an ink jet method for transferring images will yield very soft muted results.
Stay tuned for when I demo the same project using a color laser transfer. It's a way different look!


You Can Paint These Trees and More

Get Your Video Course Now
Introductory Price
Save 30% plus
a Money Back Guarantee


You Can Paint These Trees and More
Get Your Video Course Now
Introductory Price
Save 30% plus
a Money Back Guarantee
Recent Articles
-
Earmark decorative painting studio in Ottawa! A cozy place to paint.
May 02, 26 03:28 PM
 Earmark decorative painting studio is a very comfortable and relaxing studio and classroom catering to all painting levels.Located in rural, scenic Ottawa.
 -
CBP0012 Funky Winter Chicken
Apr 14, 26 03:18 PM
 You'll get your funky dance on with my Funky Winter Chicken e-Pattern Packet. Detailed step-by-step instructions, line drawings, pictures and materials ensure your success with this project.
 -
CBP0045 Stained Glass Coasters Pattern Packet
Apr 14, 26 03:16 PM
 This faux Stained Glass Coasters Pattern Packet will provide you with hours of fun creating and using these coasters.
 -
CBP0005-Daisies at Dusk
Apr 14, 26 03:06 PM
 We all love daisies and you will love painting Daisies at Dusk. This decorative painting e-packet also known as a tole painting e-pattern has detailed step-by-step instructions, lots of pictures, mate…
 -
CBP0004-Get-Crackin
Apr 14, 26 03:03 PM
 Here's Get-Crackin, an advanced, trompe loeil pattern packet. You will love the results you get. Detailed step-by-step instructions and lots of pictures.
 -
CBP0002-hey-tiger
Apr 14, 26 02:57 PM
 CBP0002-hey-tiger is a beautiful Eastern Tiger Swallowtail butterfly
 -
CBP0028-High Realism Poppy Pattern Packet
Apr 14, 26 02:49 PM
 Enjoy CBP0028-High Realism Poppy Packet. This project is guaranteed to please. Settle into a quiet place, add layers and watch this poppy come alive.


Site Search
| site search by freefind | advanced |


You Can Paint These Trees and More
Get Your Video Course Now
Introductory Price
Save 30% plus
a Money Back Guarantee