How To Paint Landscapes
Seems everyone wants to learn how to paint landscapes. Well here’s a simple landscape painting workshop just for you. There are many ways to represent landscapes. You can paint very high realism or you can suggest a landscape in an abstract way. The possibilities are endless and it’s so much fun to experiment.
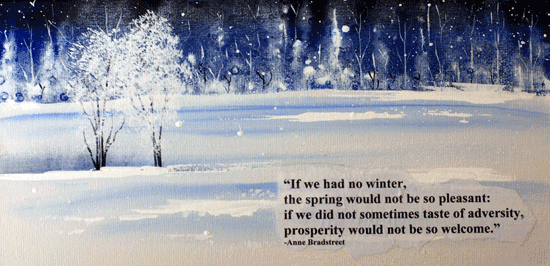
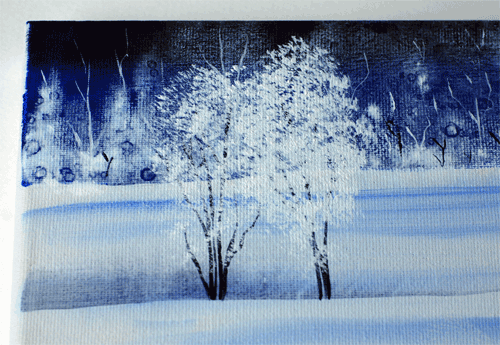
On this page we will eventually cover many themes, seasons, points of interest like mountain ranges, distant rolling pastures and much, much more. However, for the sake of just getting the ball rolling and for my visitors who’ve never painted before, I offer you a really easy winter landscape with a touch of abstract…just a little.
Paint this small canvas following my step-by-step instructions and add an inspirational message of your choice. You see? Learning how to paint landscapes can be really simple!
OK, here are the things you’ll need for this lesson on how to paint landscapes.
SURFACE
12 x 6 pre-primed canvas
BRUSHES
#1 Liner Brush
#5 Round
¼” Deerfoot Brush
1-inch Flat Glaze Brush
1-inch Sponge Brush
ACRYLIC PAINT (I used DecoArt Americana)
Blue Violet
Paynes Grey
Titanium White
MISCELLANEOUSPaper towel
Water container
Styrofoam meat tray / plate or disposable palette paper
Palette knife
Spray bottle filled with water
Spray bottle filled with rubbing alcohol
Here's a line drawing to help you learn how to paint landscapes. All you have to do is download and print.
Step by Step - How to Paint Landscapes
Are you ready? Here we go from a blank canvas to the finished piece.
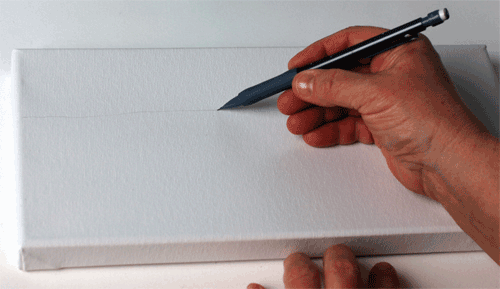
With a pencil, very lightly draw a horizon line about a third of the way down the canvas.
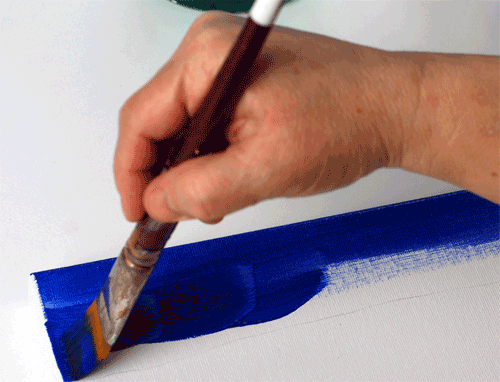
Pick up Blue Violet using the 1-inch Flat brush. On your palette or meat tray, blend the paint evenly into the bristles. Fill in the sky area. Don’t worry about brush marks in the first coat. Use a blow dryer to speed up the drying time and then add another coat of paint. If the paint seems to grab or doesn't flow nicely just add a little teensy bit of water. When done, clean the brush. Dry the canvas.
Darken the top of the sky with Paynes Grey. Simply moisten the brush in clean water, blot it a bit and pick up Paynes Grey on one corner of the brush.
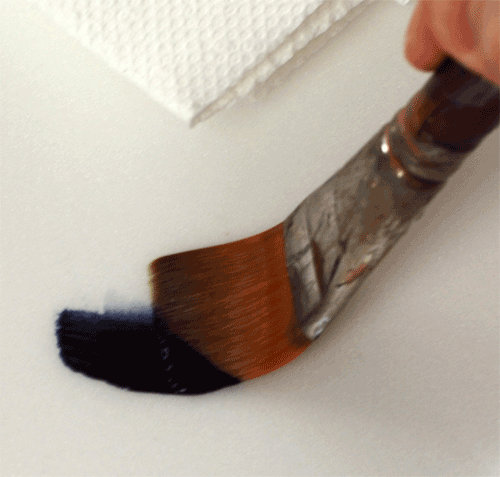
Blend the paint on your palette so the paint travels across the bristles while the other end of the brush remains clean.
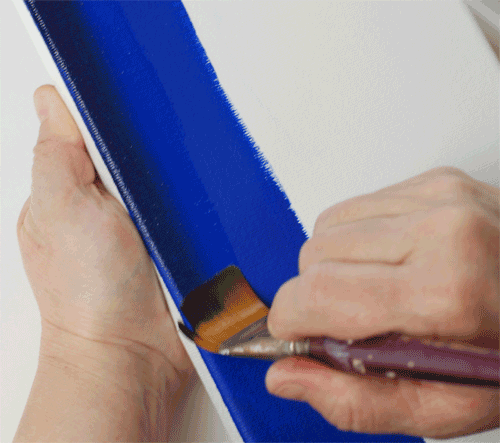
Drag the brush with the paint in the upper portion of the sky. Repeat after drying if needed. Clean your brush. Dry the canvas.
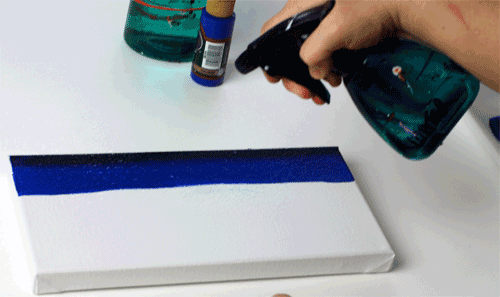
Now mist your canvas with the water.

On your palette, water down some White to the consistency of coffee cream. Use your Round brush and generously dab the paint along the horizon while the canvas is wet.
Quickly tip the canvas away from you at a slight angle to encourage the white paint to drip into the sky area. Add more watered down white along the horizon and mist a little more water until you achieve the desired effect.
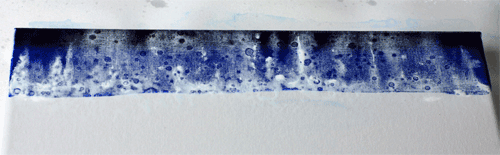
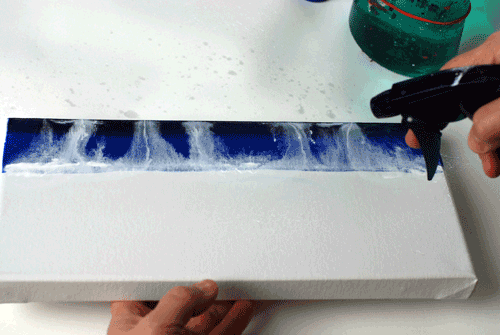
Let that set for about 1-2 minutes and then while still well, mist with rubbing alcohol. The rubbing alcohol will force the pigments in the White paint to disperse, leaving holes of various sizes. It’s a really cool effect, isn’t it? Let that dry completely without using the blow dryer.
I sometimes have to repeat the whole procedure a couple of times to get the look I want.
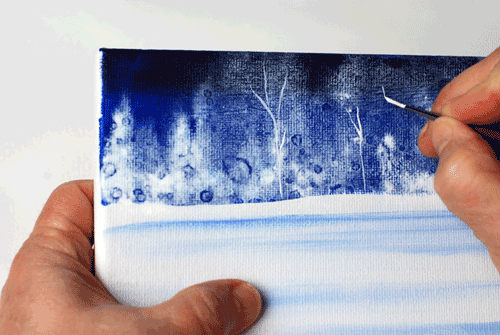
Use the Liner brush with thinned White to add distant trees. Just create different lengths of twiggy forked shapes. Use the Liner brush with thinned Paynes Grey to add bare bushes at the horizon. Dry.

Let’s make the snowy landscape. Generously pick up White on the large Flat brush and blend the paint evenly into the bristles. Pick up a touch of Blue Violet on the corner and blend so the two colors blend, leaving one side White and the other a pale blue.
Now drag the brush horizontally, back and forth and this will create the snowy landscape. Clean your brush. Dry the canvas.
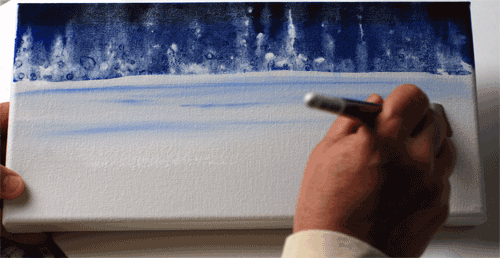
Darken the section under the trees in the foreground. Simply moisten the brush in clean water, blot it a bit and pick up Paynes Grey on one corner of the brush. Blend so the paint travels across the bristles while the other end of the brush remains clean.
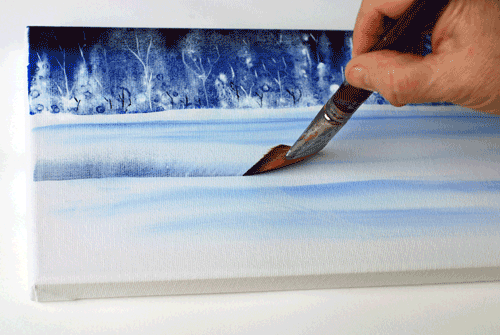
Drag the brush with the paint edge down and pull the brush horizontally as you slowly pivot the clean side of the brush down to the right. The paint stroke will be wide at the start and will narrow as you pull it along. It's called a Pivot Float. Clean your brush. Dry the canvas.
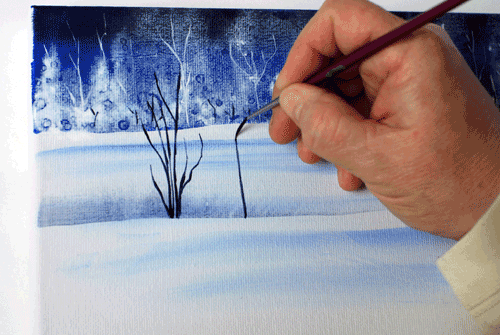
With Paynes Grey and the Liner brush, add the 2 trees in the foreground. These are just twiggy bent forked lines. The trunks are thicker at the base and narrow at the tips.
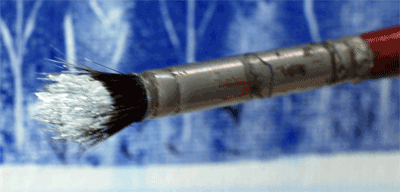
Soak the Deerfoot in water for a few minutes to soften the bristles. Blot it completely on dry paper towel. Next, load the Deerfoot brush into White. Pounce the paint onto your meat tray or palette until the hairs are lightly covered with paint and the bristles splay nicely.
Pounce the bristles all over and slightly beyond the twigs to suggest the shape of a tree. Repeat with more White on the tree on the right.
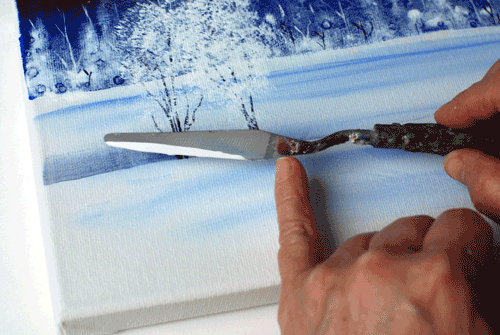
To add snowdrifts, load the back edge of the palette knife into White and then drag it along the base of the trees.

Add more drifts at the horizon here and there to add visual and textural interest.
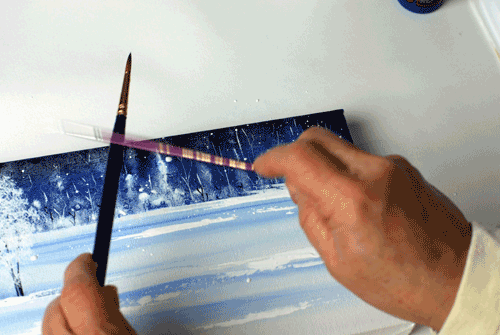
Snowflakes falling are done using thinned White (inky consistency) on the Liner brush and then tapping the handle onto the handle of another brush, spattering the snow all over. Repeat until you have all the snow you want! Let dry without using the blow dryer.
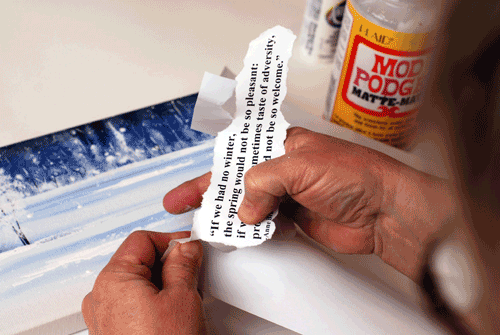
This is optional: Use a laser printer to print an inspirational message onto white paper (ink jet will smear). Tear the paper around the message.

Use the sponge brush to apply 1 coat of Mod Podge in the bottom right hand corner of the canvas where you’ll glue down the message. Lay down the message, pressing it well in place and then add a coat of the Mod Podge on top. The paper will crinkle and buckle. Use your fingers to smooth the paper down as best as possible.
That’s it! Now you know how to paint landscapes. Well this one in any case. Pat yourself on the back. Job well done. I think it would also look nice using a purple rather than the Blue Violet.
Return from How To Paint Landscapes to Home.
Return to Paint Techniques Page.
You Can Paint These Trees and More

Get Your Video Course Now
Introductory Price
Save 30% plus
a Money Back Guarantee


You Can Paint These Trees and More
Get Your Video Course Now
Introductory Price
Save 30% plus
a Money Back Guarantee
Recent Articles
-
Earmark decorative painting studio in Ottawa! A cozy place to paint.
May 02, 26 03:28 PM
 Earmark decorative painting studio is a very comfortable and relaxing studio and classroom catering to all painting levels.Located in rural, scenic Ottawa.
 -
CBP0012 Funky Winter Chicken
Apr 14, 26 03:18 PM
 You'll get your funky dance on with my Funky Winter Chicken e-Pattern Packet. Detailed step-by-step instructions, line drawings, pictures and materials ensure your success with this project.
 -
CBP0045 Stained Glass Coasters Pattern Packet
Apr 14, 26 03:16 PM
 This faux Stained Glass Coasters Pattern Packet will provide you with hours of fun creating and using these coasters.
 -
CBP0005-Daisies at Dusk
Apr 14, 26 03:06 PM
 We all love daisies and you will love painting Daisies at Dusk. This decorative painting e-packet also known as a tole painting e-pattern has detailed step-by-step instructions, lots of pictures, mate…
 -
CBP0004-Get-Crackin
Apr 14, 26 03:03 PM
 Here's Get-Crackin, an advanced, trompe loeil pattern packet. You will love the results you get. Detailed step-by-step instructions and lots of pictures.
 -
CBP0002-hey-tiger
Apr 14, 26 02:57 PM
 CBP0002-hey-tiger is a beautiful Eastern Tiger Swallowtail butterfly
 -
CBP0028-High Realism Poppy Pattern Packet
Apr 14, 26 02:49 PM
 Enjoy CBP0028-High Realism Poppy Packet. This project is guaranteed to please. Settle into a quiet place, add layers and watch this poppy come alive.


Site Search
| site search by freefind | advanced |


You Can Paint These Trees and More
Get Your Video Course Now
Introductory Price
Save 30% plus
a Money Back Guarantee