Dry Brush Technique
There are a few different ways of doing a dry brush technique in decorative painting.
The technique is used to produce subtle build up of color and it looks best, in my humble opinion, on a textured surface. But it does work on smooth surfaces as well.
Dry brushing can be done using a variety of brushes, from Domed Rounds to Filberts, Rounds, Flat Shaders, Stipplers, Scumblers and Deerfoots... or is the plural Deerfeet? :o)
For the purposes of this demonstration, I've basecoated my
background in Deep Midnight Blue by using a cosmetic sponge. This creates a light, pebbly texture that will enhance the dry brushing appearance.
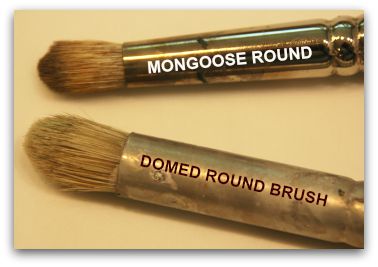
Let's start with the Domed Round brush.
Introducing... Earmark Creative Studio

The Domed Round brush is also referred to as a Mongoose Round. It comes in many sizes, so choose a large one for a larger area and obviously scoot down to a smaller size if you're doing a small area.
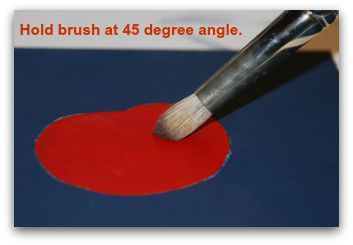
Always hold the brush at a 45 degree angle. If you put the brush down on its tip all you'll create are holes in your paint.
OK, so it's obvious by its name that this technique uses a dry brush. So don't moisten it.
I'm using DecoArt Americana acrylics for this demonstration. Here I have a red fruit for my demo. Pick up Primary Red and a bit of Marigold on the Domed Round and simply brush mix to a lighter shade than the base coat.
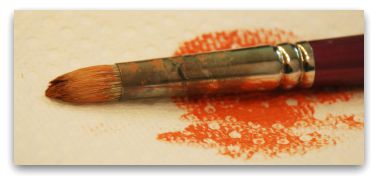
On a clean paper towel, wipe off the paint. What remains on the brush should feel almost dry.

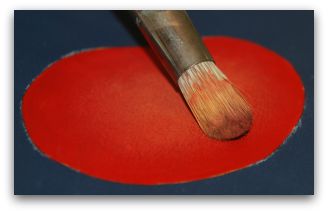
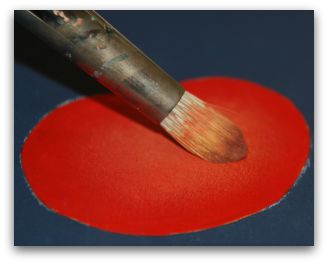
Place your brush at a 45 degree angle in the brightest area you wish to highlight, lightly brushing in a circular fashion with the brush tip facing outward. Turn your work as you go. Push the highlight out almost to the edges of the fruit.
Roll the brush between your fingers from time to time while you're working to ensure you get the paint from all the bristles.
Start painting with a light touch, adding more pressure as less and less paint comes off the brush.
On the dirty brush, pick up a bit more Marigold, blend it well in the bristles. Wipe it dry on a clean, dry paper towel. Repeat the dry brushing, only this time don't go out as far.
Clean the brush with gel hand sanitizer, blot completely dry.
Load the brush again in the Marigold repeat the dry brush technique for the next highlight layer, again not going out quite as far as the previous highlight.
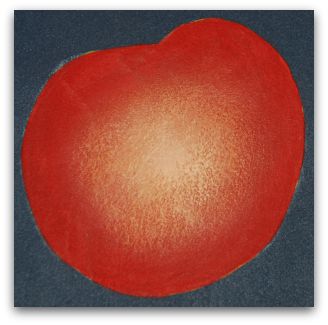
Load the dirty brush into a mix of Marigold and White for the final highlight.
TROUBLESHOOTING
If you're getting smears, there's too much paint left in your brush. Wipe it on a clean, dry paper towel. You may also be getting smears if you're wiping off the paint on a damp paper towel.
The paint is lifting in the middle of your highlight means your brush is being held at a perpendicular angle. Lay the brush down at a 45 degree angle.
Let's work with the Filbert for another dry brush technique!

Dampen the brush and then blot it very thoroughly.
For this dry brush technique, you're actually going to keep some paint in the brush, but not much.
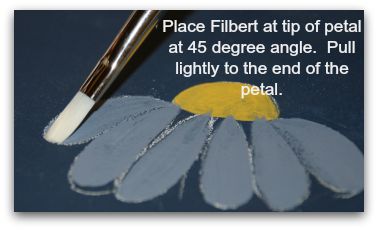
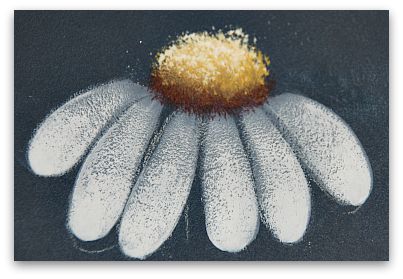
Here I've basecoated a daisy center with Marigold and the petals were stroked in with French Grey Blue.
To create the first highlight layer, mix a touch of White in with the French Grey Blue. Pick up up paint on the brush halfway up the bristles. Blend well on the palette, then stroke both sides of the brush just once onto a dry paper towel.
Place the tip of the brush at the tip of the petal, lightly
dragging the brush back to the base of the petal. Stroke over and over,
turning the brush over until no paint remains on the brush.
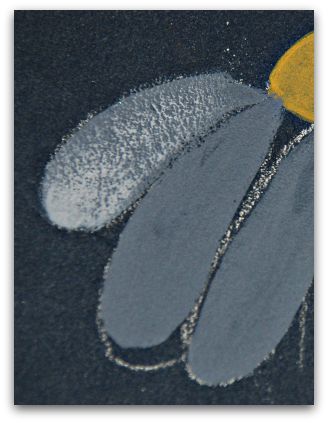
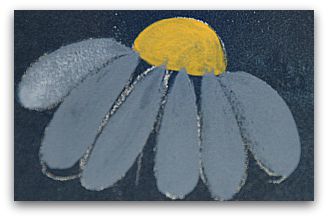
Add another layer with a slightly lighter mix of White and French Grey Blue.
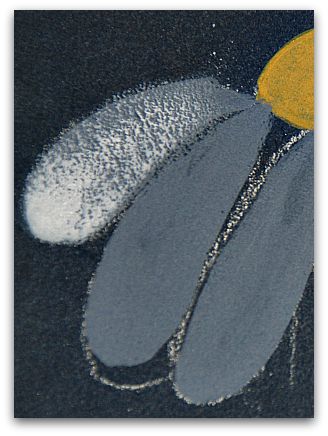
Repeat with just White. Do the same for all of the petals.
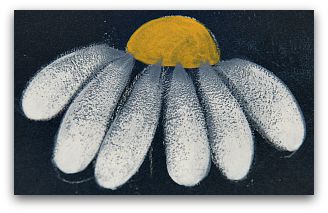
Let's create some texture with the Deerfoot!
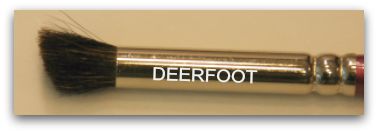
The Deerfoot can be used wet or dry. For this dry brush technique we'll use it dry. But first, soak the hairs in clean water for about 5 minutes to allow the hairs to swell and soften. Then blot it as dry as you can.
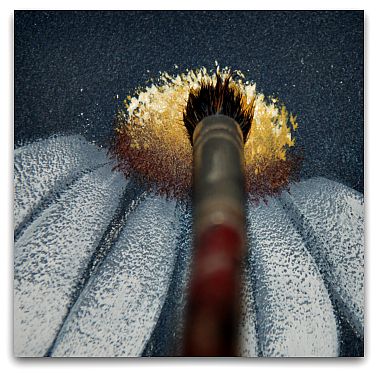
The brush is cut at a 45 degree angle. The long hairs are referred to as the toe and the short hairs as the heel. So it looks like the hoof of a deer.
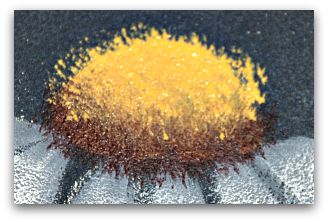
Load the toe of the Deerfoot into Black Plum. Pounce the brush on the palette until there's just a little paint remaining.

Place the whole foot of the brush down with the toe on the flower center
facing the base of the petals. Pounce on to create a shadowy texture. Notice that some of the stippling covers where the petals and center meet?
Rinse the brush and blot it thoroughly.
Load the toe into Marigold and this time keep the toe pointed around the top of the flower center, stippling lightly, making your way down and mixing in a little with the wet Black Plum you've already stippled.
Repeat the final highlight with just White, keeping the toe mostly at the top of the flower center.
Much more coming soon...
Please check back again as I continue to add more and more on ways to do the dry brush technique. For now let's go from the dry brush technique page back to the Paint Techniques page.
You Can Paint These Trees and More

Get Your Video Course Now
Introductory Price
Save 30% plus
a Money Back Guarantee


You Can Paint These Trees and More
Get Your Video Course Now
Introductory Price
Save 30% plus
a Money Back Guarantee
Recent Articles
-
Earmark decorative painting studio in Ottawa! A cozy place to paint.
May 02, 26 03:28 PM
 Earmark decorative painting studio is a very comfortable and relaxing studio and classroom catering to all painting levels.Located in rural, scenic Ottawa.
 -
CBP0012 Funky Winter Chicken
Apr 14, 26 03:18 PM
 You'll get your funky dance on with my Funky Winter Chicken e-Pattern Packet. Detailed step-by-step instructions, line drawings, pictures and materials ensure your success with this project.
 -
CBP0045 Stained Glass Coasters Pattern Packet
Apr 14, 26 03:16 PM
 This faux Stained Glass Coasters Pattern Packet will provide you with hours of fun creating and using these coasters.
 -
CBP0005-Daisies at Dusk
Apr 14, 26 03:06 PM
 We all love daisies and you will love painting Daisies at Dusk. This decorative painting e-packet also known as a tole painting e-pattern has detailed step-by-step instructions, lots of pictures, mate…
 -
CBP0004-Get-Crackin
Apr 14, 26 03:03 PM
 Here's Get-Crackin, an advanced, trompe loeil pattern packet. You will love the results you get. Detailed step-by-step instructions and lots of pictures.
 -
CBP0002-hey-tiger
Apr 14, 26 02:57 PM
 CBP0002-hey-tiger is a beautiful Eastern Tiger Swallowtail butterfly
 -
CBP0028-High Realism Poppy Pattern Packet
Apr 14, 26 02:49 PM
 Enjoy CBP0028-High Realism Poppy Packet. This project is guaranteed to please. Settle into a quiet place, add layers and watch this poppy come alive.


Site Search
| site search by freefind | advanced |


You Can Paint These Trees and More
Get Your Video Course Now
Introductory Price
Save 30% plus
a Money Back Guarantee