S-STROKE

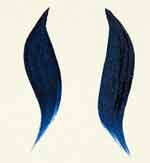
The S-stroke, in decorative painting, is frequently used for painting leaves. See how the brush strokes on the left suggest the shape of leaves? These are cleverly known as … one-stroke leaves. This stroke is also great for painting beautiful floral borders and as vine fillers.
Like other strokes, this one can be painted with a round, a liner or a flat brush.
If you haven’t visited our Brush Stroke Basics page, we suggest you do. This will give you a better understanding of the main elements that go into all strokework.
The S-stroke is not as “esss-y” as the name suggests, but is actually a more gentle Hogarth curve shape. It’s neat to experiment, because depending on the brush type and the pressure used, you get completely different effects.
Regardless of the brush, the blending technique is the same.
· Always wet the brush well, then blot gently on your paper towel. Also blot any water drops clinging to the handle or ferrule.
· Pick up a generous amount of paint, blending well on the palette. If you stay in the same blending area, you’ll keep more paint on the brush.
· Remember all the brush hairs need to be coated in paint. When one side is blended, then turn the brush over and blend the other side.
For a round brush, tap and roll the tip a bit to ensure you have a nice point; for a flat brush, it’s important to shape the brush back to a sharp chisel edge.
Hold your brush by the ferrule, checking that the handle is somewhat perpendicular to the surface.
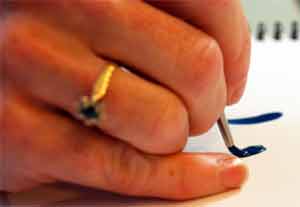
As demonstrated on the left, it’s generally easier for most painters to extend their pinky for supporting and balancing, their hand.
The stroke begins and ends all the while moving in the same direction. So, if you're pulling the stroke to the left when you start, you'll end the stroke pulling to the left.
In between the start and end, simply apply pressure on the brush. This will create the body of the stroke or leaf.
Round Brush S-Stroke
Start with the brush tip just touching the surface and begin to pull the stroke. Now apply gradual pressure as you change direction. About halfway through the stroke (the point at which the most pressure is applied) gradually let up the pressure as you change back to the original direction and return to the brush tip.
Flat Brush S-Stroke
To create a nice stroke, the chisel edge of the brush is set down to form a thin line for the beginning of the stroke. Gently slide, and begin to apply pressure to the flat of the brush as you start changing direction. About halfway through the stroke (the most pressure), begin to let up the pressure as you gradually return to the chisel edge.
If you end up with a stroke looking more like a “Z”, the bad news is that it’s not a successful S-stroke. The good news is that it’s a zig zag stroke instead!
A mistake we see a lot is when
beginners try to apply pressure right away on the chisel edge of the
brush. The initial sliding motion needs to be on the knife’s edge, with
a slight roll to ensure the flat of the bristles are in contact with
your surface.
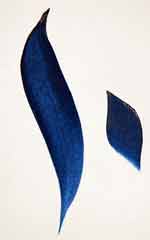
As you can see, these examples clearly show that a long S stroke would make a perfect tulip leaf. And a short stroke looks like a little leaf.
It's one of those strokes that the more you practice it, the better you get at it.
Let's leave S-Stroke and go to Tole Brush Strokes.
Return to our Decorative Painting Home Page.
You Can Paint These Trees and More

Get Your Video Course Now
Introductory Price
Save 55% plus
a Money Back Guarantee


You Can Paint These Trees and More
Get Your Video Course Now
Introductory Price
Save 55% plus
a Money Back Guarantee
Recent Articles
-
Preserving artwork
Apr 18, 24 03:38 PM
Cheryl, Is it necessary to spray artwork with an acrylic spray if I use a quality canvas listed as “archival”? Cheryl, are you still writing newsletters? -
Can you paint more after setting in oven?
Feb 16, 24 06:36 AM
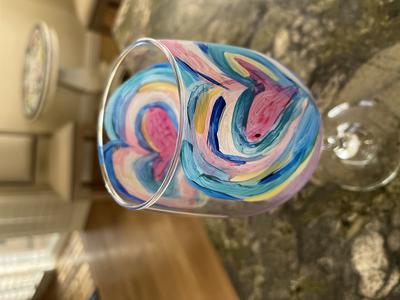
 Hi there I had taken a class and painted a wine glass, then set the paint in the oven. Can I add more paint or designs and re-sent again in the oven?
 -
gallery glass
Dec 11, 23 07:44 AM
Can Gallery Glass be restored if it has thickened? -
gallery glass
Sep 19, 23 07:44 AM
Can Gallery Glass be restored if it has thickened? -
Looking to commission an artist to paint a milk churn for me!
Sep 19, 23 07:43 AM
Greetings I am looking to commission a recognized artist in this field do you or someone you could recommend my name is Lesley Kelly Cell 403 512 8911 -
GLAZE FINISH - what is available now?
Sep 19, 23 07:42 AM
As you said, Delta PermEnamels are discontinued. I would finish off fixing my ceramic vintage pieces with their glaze (either clear gloss or satin). -
Glass Paint Temperature Considerations?
May 15, 22 11:10 AM
I’m wondering how durable glass paint/faux leading is giving shifting temperatures? Or, if some glass paint brands are better for this than others? For
Site Search
| site search by freefind | advanced |


You Can Paint These Trees and More
Get Your Video Course Now
Introductory Price
Save 55% plus
a Money Back Guarantee
New! Comments
Have your say about what you just read! Leave me a comment in the box below.