How To Paint Eyes
From early on I always wanted to know how to paint eyes. You know, to add some life to them. To make them seem more real.
I've been doodling and drawing eyes since I was very young. I loved trying to make them look nice but something was always just off and I couldn't figure it out.
And then I realized that there's really only one very
important thing to know. And I want
you to remember this for ever more if you really want to know how to paint eyes.
Introducing... Earmark Creative Studio

The human eyeball
is not a perfect round sphere.
The iris is also not a perfect circle.
Nor is the pupil.
Eyeballs sit in the eye sockets of the skull. Then depending on your family traits and where you come from, the skin that covers your eyes will create your particular eye shape and of course give you your eye color. But the eyeball, iris and pupil do not change shape. Your iris may be larger or smaller than mine but they are generally a roundish sphere.
So let's say you're painting laughing eyes. The upper and lower lid will close quite a bit revealing only a little of the iris and pupil. Right?
But behind the laughing eyes, nothing changed.
The biggest mistake I see is the tendency to squash the iris to make it fit into the eye opening. That's why your portraits or casual characters don't look quite right.

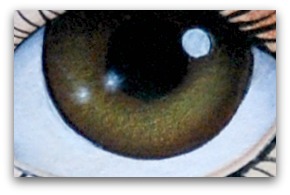
This is the doodle that inspired me to create the How To Paint Eyes tutorial.
So let's start the demo on how to paint eyes.
Here I've prepared a page in my journal by basecoating it in DecoArt Soft Peach. I've used DecoArt Americana acrylics throughout this project. To complete it you'll need the following brushes: #12 flat, 10/0 liner, #4 filbert, 1/4-inch domed round.
The line drawing for the "how to paint eyes" tutorial can be downloaded here.
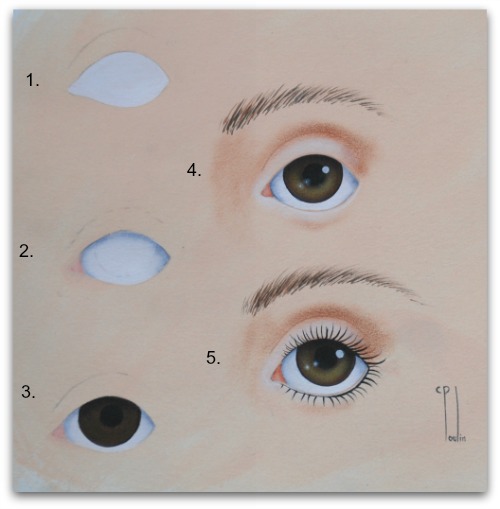
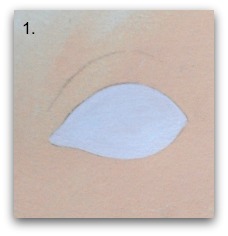
1. Trace out the line drawing onto tracing paper. Lightly transfer the main outline of the eye as well as the upper eyelid crease. Basecoat the eye area with a few coats of White using the filbert.
2. Transfer the left edge of the eyeball creating a small triangular area on the left. Basecoat this section with a mix of just a touch of Cadmium Red and mostly Soft Peach.
Use the #12 flat to add a soft float of Payne's Grey to shade under the top lid on the eyeball. When dry, float the left side of the eyeball and the right corner of the eye.

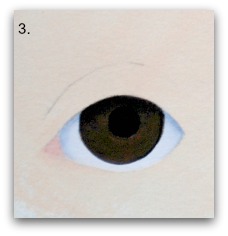
3. Transfer the iris and basecoat it with Dark Chocolate using the filbert. When completely dry and opaque, transfer the pupil and basecoat it Black, using the filbert.
When dry, use the #12 flat to float a shade on the iris under the lid with Black. It should be the same width as the shading on the eyeball.
4. Transfer the eyebrow then use the liner to add fine lines with Dark Chocolate and then add a few more fine lines with a mix of Dark Chocolate and touch of Black.
Mix some Burnt Sienna with mostly Soft Peach to line in the crease. Use this same mix to outline the entire eye.
With the #12 flat, float the pink corner of the eye with Burnt Sienna, first next to the eyeball and then into the very corner. These are narrow and soft floats.
Using a domed round, dry brush Marigold to highlight the iris. Stay out of the shaded area and away from the very edge of the iris. Clean the brush.
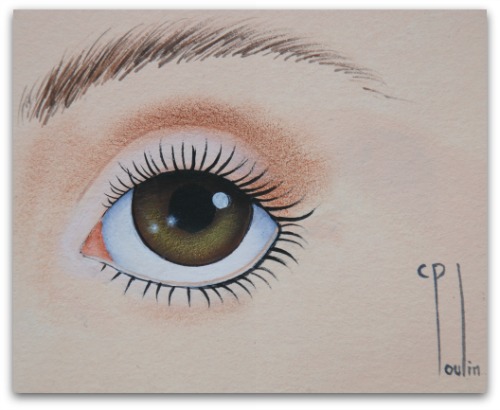
Use the liner and a mix of mostly White and touch of Soft Peach to outline the lower lid just below the first outline you did. Repeat until it is a shade or two lighter than the original skin tone. Refer to the close up image.
Use the dry domed round to dry brush some Burnt Sienna in the crease and outer corner of the upper lid. Use the worksheet as a guide. Dry brush up toward the start of the eyebrow. Then add just a little shade under the eye as indicated in the line drawing and work sheet.
Add a touch of Dark Chocolate to the Burnt Sienna and deepen the shading in the crease of the eye only.
Dry brush White on the eyelid and on the outer edge of the corner of the eye as well as above the shading under the eye.
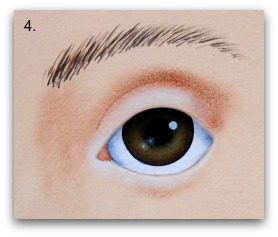
On the iris at about 2 o'clock, add a strong shine highlight of White using the liner. The shine highlight circle overlaps both the pupil and iris.
To create the two soft shine highlights on the other side first dampen the iris. While damp, use the tip of the liner and thinned White to tap in two tiny dots. The dampness will diffuse the dots. When dry add a tiny strong dot of White to both those highlights.
5. Transfer the eyelashes to the top lid. Then transfer the eyelashes to the lower lid. Notice the top lashes touch the very edge of the lid? Now see where the eyelashes start on the lower lid? Yes, that's right. There is a little flesh outline between the eyeball and the lash line.
Use the liner and Black to add the lashes. Then outline the top lid with a very fine line of Black. Then add a little eyeliner to the bottom lashes.
So you're wondering how on earth did I get my eye shape to remain so perfectly round?
After finishing the painting, I noticed the iris was just off by a bit. So I took out my trusty Staedtler Professional Combo Circle Template # 977 / 110 and re-outlined the iris using a permanent black fine tipped marker. Where needed, I used White paint where I went outside the line and Dark Chocolate where I missed a spot.
Even though eyes are not 100% round, it looks better if you paint them as round as possible because in real life, they look pretty darn round.
And it will be a reminder not to squish the iris between squinting lids.
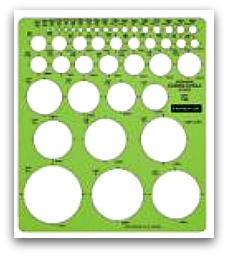
You can get this template in any store that carries office supplies or drafting supplies. I use mine all the time!
Well that's it for the how to paint eyes tutorial. Of course there are many other types of eyes to be painted. But just remember that the human eyeball
is a perfect round sphere.
The iris is a
perfect circle.
And the pupil is a
perfect circle located directly in the middle of the iris.
Let's go from the How to Paint Eyes page back to the Paint Techniques page.
You Can Paint These Trees and More

Get Your Video Course Now
Introductory Price
Save 30% plus
a Money Back Guarantee


You Can Paint These Trees and More
Get Your Video Course Now
Introductory Price
Save 30% plus
a Money Back Guarantee
Recent Articles
-
Earmark decorative painting studio in Ottawa! A cozy place to paint.
May 02, 26 03:28 PM
 Earmark decorative painting studio is a very comfortable and relaxing studio and classroom catering to all painting levels.Located in rural, scenic Ottawa.
 -
CBP0012 Funky Winter Chicken
Apr 14, 26 03:18 PM
 You'll get your funky dance on with my Funky Winter Chicken e-Pattern Packet. Detailed step-by-step instructions, line drawings, pictures and materials ensure your success with this project.
 -
CBP0045 Stained Glass Coasters Pattern Packet
Apr 14, 26 03:16 PM
 This faux Stained Glass Coasters Pattern Packet will provide you with hours of fun creating and using these coasters.
 -
CBP0005-Daisies at Dusk
Apr 14, 26 03:06 PM
 We all love daisies and you will love painting Daisies at Dusk. This decorative painting e-packet also known as a tole painting e-pattern has detailed step-by-step instructions, lots of pictures, mate…
 -
CBP0004-Get-Crackin
Apr 14, 26 03:03 PM
 Here's Get-Crackin, an advanced, trompe loeil pattern packet. You will love the results you get. Detailed step-by-step instructions and lots of pictures.
 -
CBP0002-hey-tiger
Apr 14, 26 02:57 PM
 CBP0002-hey-tiger is a beautiful Eastern Tiger Swallowtail butterfly
 -
CBP0028-High Realism Poppy Pattern Packet
Apr 14, 26 02:49 PM
 Enjoy CBP0028-High Realism Poppy Packet. This project is guaranteed to please. Settle into a quiet place, add layers and watch this poppy come alive.


Site Search
| site search by freefind | advanced |


You Can Paint These Trees and More
Get Your Video Course Now
Introductory Price
Save 30% plus
a Money Back Guarantee