BRUSH STROKE BASICS - TOP TIPS!

Reviewing these simple brush stroke basics will not only improve your technique, it will greatly strengthen all of your painting. If you take the time and follow these steps, we know that your efforts and hard work will be rewarded. And like other skills that are well practiced, after a while, they’ll come naturally to you.
Brush Stroke Basics #1:
The Paint Brushes
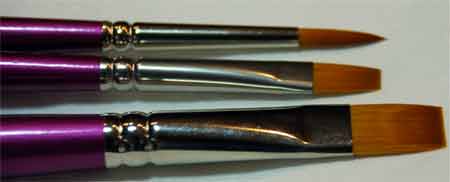
The first tip we can give you is that your brushes need to be of very good quality and in excellent condition. Please resist the urge to skimp here.
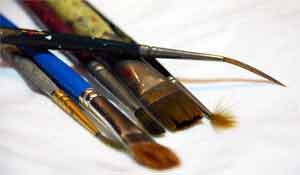
A package of 4 brushes bought on sale for $1.99 might be great for general craft painting, but will only frustrate you when you’re doing brush strokes.
And unfortunately, splayed hairs, dried paint, and hooked liners (like the ones featured here) just won’t cut it no matter how hard you try!
Brush Stroke Basics #2:
Paint Consistency
Proper paint consistency is key for brush strokes. Actually, it’s also extremely important for all of your painting projects.
Acrylic paint consistency right out of the bottle varies from color to color and brand to brand. So you will often need to thin it with water. The amount of water you use depends on the type and size of strokes you’re doing.
Most Stroke Work
Using paint that’s the consistency of light to heavy dairy cream is a good guide since brush strokes are more interesting if they have some texture.
In the case of stroke work, brush bristles that have been well dampened and lightly blotted on your paper towel, will hold just enough water.
If you find you need to add more water to achieve that “light cream” consistency, dab the bristles into a little droplet of water and work it into the paint puddle of your blending area.
For Scrolls and Linework

When you’re doing finer scrolls, filigree or linework, the paint must flow easily from your brush, so more water must be added. This paint to water ratio is referred to as inky consistency.
Brush Stroke Basics #3:
Too Much, Too Little Paint

Blending paint thoroughly into your brush is a step you definitely don’t want to skip. Are you heavy-handed or a dibby-dabber? This picture is a typical dibby-dabber approach...not enough paint!
Try this:
 Scoop up a generous quantity of paint then begin pressing and blending the paint into the bristles, staying in the same blending area.
Generally, if you press down so that the bristles fan out then gently pull and lift the brush handle towards yourself, you’ll be using the proper motion. Repeat this motion several times; flip the brush over and repeat some more.

You may need to scoop up more paint and blend again. You’re trying to coat all the brush hairs, even the ones in the middle, so the right amount of paint and pressure are needed (attention dibby-dabbers!).
As shown in the photo on the right-hand side, watch to make sure the paint has not gone up and over the ferrule (you’re too heavy handed!); also you want to see the hairs through the paint and not just a big blob around the bristles.
After flattening down on the bristles to blend, you might need to gently coax back the brush shape by touching it to the palette.
Brush Stroke Basics #4:
Cleaning as You Go.
With acrylic paints, it’s important to rinse your brushes often. Since painting brush strokes means loading your brush well with paint, it’s easy for it to accumulate in the hairs. Even though your brush may be wet with paint, it can still dry inside where the bristles are closest to the ferrule area.
To prevent this from happening, follow these brush-saving tips:
·Every few minutes, thoroughly rinse your brush then blot it and fully re-load with paint.
·It isn’t necessary to completely rinse your brush after every few strokes. Sometimes you might need to pick up a bit more water, to make your paint the right consistency. Other times you might need to do a “quickie” rinse, where you swish gently in the water without removing all of the paint, blotting and reloading.
·Once you’ve been painting for a while, you get a feel for when it’s time to do a complete rinse.
·Every so often, we suggest you check the hairs near the ferrule to make sure paint has not built up there. If it has, then clean the brush with brush cleaner, rinse it clean and continue on with your project.
Brush Stroke Basics #5:
Posture, Motion and Positioning

In strokework, the motion comes from your shoulder using the whole arm. If you bend your arm at elbow height, then pretend you’re polishing furniture … just pretend … (we don’t actually do it), you’ll feel the correct rotation in your shoulder. There is no wrist action involved.
To free up and support your arm, yet still be able to anchor your hand, extend your pinky allowing it to move freely over the surface. The pinkie acts as a stabilizer for the arm.
Also, some people find it easier to paint with their surface on their lap while others sit on a high stool at a table. Try different positions until you are comfortable. Get up and stretch from time to time.
Brush Stroke Basics #6:
Flag for Visual Cue

Many instructors suggest attaching a triangular flag to the end of your brush handle. Since the brush should rarely twist in your hand, the flag will tell you if you’re rotating the handle.
It’s important to slow down and let the brush do the work. Your mission … should you choose to accept it … is to merely guide it along. :o)
Good strokework is a combination of fluid motion plus the correct application and release of pressure. Always pull the brush hairs towards you and watch out for those flailing flags!
Brush Stroke Basics #7:
Practice…Over and Over!
We’ll say it again … practice, practice, practice! You’ll probably need to paint 100’s … yes that’s hundreds of strokes … before you feel comfortable with them. Allow yourself to wobble, so you can identify what’s wrong, and then learn to fix it. Of course, one of the nice things about strokework is that no two strokes are alike, so it’s not about being perfect!
First comes understanding what to do. Then comes training the brain to connect with the hand. It’s the same for everyone. Once you’ve got it, try pulling your strokes in all directions. Then if you can do them standing on your head, go for it!
On your head? What other painting acrobatics can be found on this site?
Let's leave Brush Stroke Basics and go to Tole Brush Strokes.
Return to our Decorative Painting Home Page.
You Can Paint These Trees and More

Get Your Video Course Now
Introductory Price
Save 55% plus
a Money Back Guarantee


You Can Paint These Trees and More
Get Your Video Course Now
Introductory Price
Save 55% plus
a Money Back Guarantee
Recent Articles
-
Can you paint more after setting in oven?
Feb 16, 24 06:36 AM
 Hi there I had taken a class and painted a wine glass, then set the paint in the oven. Can I add more paint or designs and re-sent again in the oven?
 -
gallery glass
Dec 11, 23 07:44 AM
Can Gallery Glass be restored if it has thickened? -
gallery glass
Sep 19, 23 07:44 AM
Can Gallery Glass be restored if it has thickened? -
Looking to commission an artist to paint a milk churn for me!
Sep 19, 23 07:43 AM
Greetings I am looking to commission a recognized artist in this field do you or someone you could recommend my name is Lesley Kelly Cell 403 512 8911 -
GLAZE FINISH - what is available now?
Sep 19, 23 07:42 AM
As you said, Delta PermEnamels are discontinued. I would finish off fixing my ceramic vintage pieces with their glaze (either clear gloss or satin). -
Glass Paint Temperature Considerations?
May 15, 22 11:10 AM
I’m wondering how durable glass paint/faux leading is giving shifting temperatures? Or, if some glass paint brands are better for this than others? For -
How to make a collage in a few easy steps.
Feb 11, 22 01:35 PM
 Master how to make a collage with my simple step-by-step tutorial. Lots of pictures and free downloads too!
Site Search
| site search by freefind | advanced |


You Can Paint These Trees and More
Get Your Video Course Now
Introductory Price
Save 55% plus
a Money Back Guarantee
New! Comments
Have your say about what you just read! Leave me a comment in the box below.