Paint A Poppy

Ah yes, to paint a poppy! That crumpled petaled flower that brings such liveliness to any garden! So pretty! Such attitude!
My email subscribers decided that they would like to see me paint a poppy. I love my subscribers. We have a great relationship. We share information all of the time. So when they asked, I took the opportunity to share.
The videos below of me painting a poppy are the result.
By the way, if you are not a subscriber to my newsletter, The Creative Chronicles, you don't know what you're missing. There's always lots to learn and share. And I love to have fun. So come on, join our happy family.
Ahem... I went off on a bit of a tangent there. Okay... now I'm back. Where was I? Oh yes, I was talking about painting poppies.
I've decided the best way to share this with you is to do it by video. There will be a number of them... videos that is. I don't know just how many. But I will post them on this page as I produce them. And I will stop when the painting is completed.
You might consider bookmarking this page and checking back from time to time. Of course if you subscribe to The Creative Chronicles I'll tell you when I publish each one.
This is a bit of an adventure. I really don't have a complete plan on how I'm going to pull this off. I have a few ideas kicking around. So who knows what will happen? I do know one thing for certain. This is going to be fun!
So let's get started.
How to Paint A Poppy - Part One
In Video 1, I show you how I prepare my canvas background. And rather than work in my studio as I normally do, I did something completely different. So grab a cup of coffee and join me as we get underway with this painting.
First off, I'm working on a 24 x 30 pre-primed canvas. Love working big. If you haven't tried working on a larger scale you are in for a treat!
For this segment, the paints I chose are acrylics by DecoArt Americana:
Lamp (Ebony) Black
Russet
Plantation Pine
Avocado
I used a 2-inch flat brush for slip-slapping the background as well as a smaller 1-inch flat.
More details will follow as the painting develops! Stay tuned!
Oh... I almost forgot to say... Please leave me feedback below. I love to receive feedback. That's how I learn how to provide you exactly what you want and need.
How to Paint A Poppy - Part Two
In Video 2, I continue building the foundation for my Poppy painting. And once again, I decided to work outside. The weather was beautiful, so why not?
There's a surprising twist in this video as I approach painting the poppy in a different way than you might have thought.
And, in this video, I show a miniature version of the finished piece which I had to work up to test my approach to painting the big piece.
So grab your favorite beverage and join me for Part Two of my Poppy project.
Oh... And please leave me comments below. I love to get comments from you. Also share with your friends on FaceBook. And while you're at it, don't forget to LIKE this page as well.
How to Paint A Poppy - Part Three
Video 3 picks up where I left off in the previous video. This time I decided to work in my studio.
In this video I build layers, add color and outline more of my design.
This video definitely builds on the previous ones. So if you have not seen them, check them out before viewing video 3.
So it's time once again to grab your favorite beverage and join me for Part Three of my Poppy project.
Oh... And please leave me comments below. I love to get comments from you. Also share with your friends on FaceBook. And while you're at it, don't forget to LIKE this page as well.
You can also pin the picture at the top of this page and share it on Pinterest.
How to Paint A Poppy - Part Four
Video 4 finds us back in my studio.
And there's even a little "extra". You'll get to meet one of my cats.
But on a serious note, in this video I build layers of color to push some of the petals back and to bring others forward. The use of cast shadows creates tension and will eventually make the painting appear to be almost "high definition". It's a cool effect.
I give you a quick dry brushing method that works for me that I hope you will try as well.
As always, my videos build on the previous ones. So if you have not seen them, check them out before viewing video 4.
So it's time once again to grab your favorite beverage and join me for Part Four of my Poppy project.
Oh... And please leave me comments below. I love to get comments from you. Also share with your friends on FaceBook. And while you're at it, don't forget to LIKE this page as well.
You can also "Pin" the picture at the top of this page and share it on Pinterest. I love when you do that!
In the next video I wrap it all together and give you some great tips. Stay tuned for Video 5!!
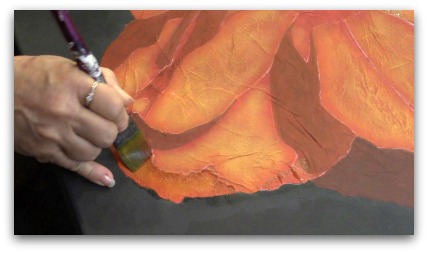
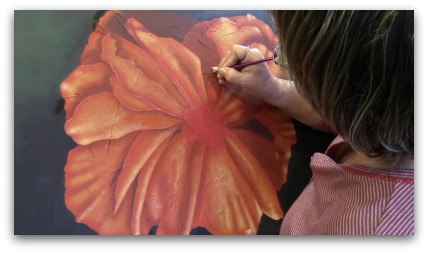
Progress continues...
Here are some images of the progress being made in the studio.

Separating petals with floated highlights.
Creating floated shades to further define petals and to add even more depth.
Cleaning up edges with liner and defining edges.
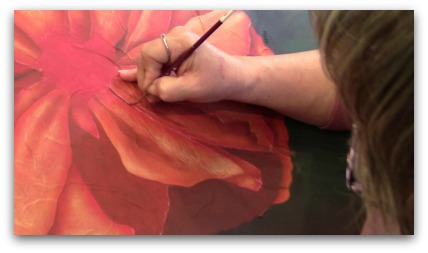
More line work details. The last Video where I complete the project is coming soon! Stay tuned!
Go from Paint A Poppy to Home.
Or if you haven't yet subscribed to The Creative Chronicles, sign up here.
You Can Paint These Trees and More

Get Your Video Course Now
Introductory Price
Save 55% plus
a Money Back Guarantee


You Can Paint These Trees and More
Get Your Video Course Now
Introductory Price
Save 55% plus
a Money Back Guarantee
Recent Articles
-
Preserving artwork
Apr 18, 24 03:38 PM
Cheryl, Is it necessary to spray artwork with an acrylic spray if I use a quality canvas listed as “archival”? Cheryl, are you still writing newsletters? -
Can you paint more after setting in oven?
Feb 16, 24 06:36 AM
 Hi there I had taken a class and painted a wine glass, then set the paint in the oven. Can I add more paint or designs and re-sent again in the oven?
 -
gallery glass
Dec 11, 23 07:44 AM
Can Gallery Glass be restored if it has thickened? -
gallery glass
Sep 19, 23 07:44 AM
Can Gallery Glass be restored if it has thickened? -
Looking to commission an artist to paint a milk churn for me!
Sep 19, 23 07:43 AM
Greetings I am looking to commission a recognized artist in this field do you or someone you could recommend my name is Lesley Kelly Cell 403 512 8911 -
GLAZE FINISH - what is available now?
Sep 19, 23 07:42 AM
As you said, Delta PermEnamels are discontinued. I would finish off fixing my ceramic vintage pieces with their glaze (either clear gloss or satin). -
Glass Paint Temperature Considerations?
May 15, 22 11:10 AM
I’m wondering how durable glass paint/faux leading is giving shifting temperatures? Or, if some glass paint brands are better for this than others? For
Site Search
| site search by freefind | advanced |


You Can Paint These Trees and More
Get Your Video Course Now
Introductory Price
Save 55% plus
a Money Back Guarantee
New! Comments
Have your say about what you just read! Leave me a comment in the box below.